Introduction to GitHub Actions

GitHub Actions is one of the powerful tools often overlooked by many beginner developers. Today, we’re going to explore GitHub Actions and how it can make your life as a developer easier…
Before You Begin…
This is an incredibly powerful tool that can help you save a significant amount of time while enabling you to write and integrate less erroneous code into your existing codebase. For this reason, I highly recommend include this tool into your daily workflow right from the beginning. If you’re a beginner, using this tool can help you maintain the quality and integrity of your codebases, ultimately benefiting you in the long run.
Please do note that I’m writing this blog assuming you have never heard of GitHub Action before and want you dip your toes into the ocean of new possiblities. With that in mind, I aim to make this as beginner-friendly as possible. Therefore, I won’t cover every possible use case of GitHub Actions with examples. Instead, I will focus on the core concepts and conclude with a simple example of a linting workflow (more on that later).
What is GitHub Action ?
GitHub Actions is a feature developed by the GitHub team a few months after GitHub was acquired by Microsoft. Initially introduced as a beta tool that enabled users to automate the building, testing, and deployment of their source code. Nearly a year of development later, it was formally launched as a powerful tool for creating CI/CD workflows. Today, GitHub Actions has become a popular and essential tool for DevOps engineers, facilitating the development and maintenance of CI/CD and automation workflows that uphold quality and integrity while implementing agile practices.
Well those are some pretty big words… let me break it down for you…
In a Nutshell, GitHub Action is a tool that is used within GitHub that performs critical actions like testing the source code, building the production build, deploying the application into server, etc. These tasks are typically considered as the DevOps practises as they’re tighly integrated into the very development of the application, thus making the development process more aglie and helping the developers to ship code faster than ever.
What makes GitHub Action unique ?
Yes, There are other alternative to GitHub Action on the market and many of them are open source and free. But here are some unique feature that is offered by GitHub Actions,
Please note that the examples provided below are meant to illustrate the differences between the tools. This does not imply that other tools are useless or overly complex. Each tool has its own advantages and disadvantages as they serve different purposes in different situations.
1) YAML Configuration
GitHub Actions uses YAML configuration files to define workflows. This makes it easy to read and write workflows, hence GitHub Action has a huge learning curve and newbies can get started in no time…
It’s ok if you don’t understand anything which is written below. All I want you to do is take a deep look at the syntax and structuring of script and compare the readability and imagine how things could get worse if this was supposed to be a huge script.
Here’s a simple GitHub Action workflow that prints “Hello World”
1
2
3
4
5
6
7
8
9
10
11
12
13
14
name: Hello World

on:
  push:
  branches:
    - main

jobs:
  say-hello:
    runs-on: ubuntu-latest

    steps:
      - name: Print Hello World
        run: echo "hello world"
Here’s the close equivalent workflow in Jenkins,
1
2
3
4
5
6
7
8
9
10
11
12
13
14
15
16
17
18
pipeline {
	agent { label 'ubuntu' }

	triggers {
		// This will trigger the job on SCM changes to the main branch
		githubPush() // Requires the GitHub plugin to be installed
	}

	stages {
		stage('Print Hello World') {
			steps {
				script {
					echo 'hello world'
				}
			}
		}
	}
}
I’ll leave it to you to judge the readability and ease of understanding between these two scripts that perform the same task.
2) It’s For GitHub
This might sound like a con for many people who are not using GitHub as their remote source control, but it’s quite opposite when it comes to GitHub users. Since this is an exclusive tool for GitHub and most of the devs (especially the beginner) use GitHub as their main remote source control, it make a lots of things easier than you imagine.
Being exclusive to GitHub allows to you do multiple things that are specific to GitHub. Here are a few of them,
- Labeling Issues and PRs.
- Assigning people to Issues and PRs.
- Requesting people to review the PRs.
- Rolling out releases.
- Publishing packages.
- Managing Projects thought GitHub Projects.
These are a few things that are part of GitHub and can be access & manipulated by GitHub Action. Not to mention from the example above (where I compare a GitHub Action workflow with Jenkins script), We needed to set up external configurations for webhooks to trigger the Jenkins script and execute the scripted actions. However, GitHub Actions offers a more streamlined experience with its extensive range of event triggers (you can find them in GitHub docs). This allows us to customize operations precisely for specific events, providing us with a greater degree of flexibility and efficiency.
3) Rich Marketplace
The beauty of any dev tool is how people come up with innovative ways to use it and GitHub Action is no exception. The GitHub Marketplace serves as a vital connection between those sharing their solutions and those seeking them. It features a variety of actions created not only by GitHub but also by developers from around the globe, fostering collaboration and innovation within the community.
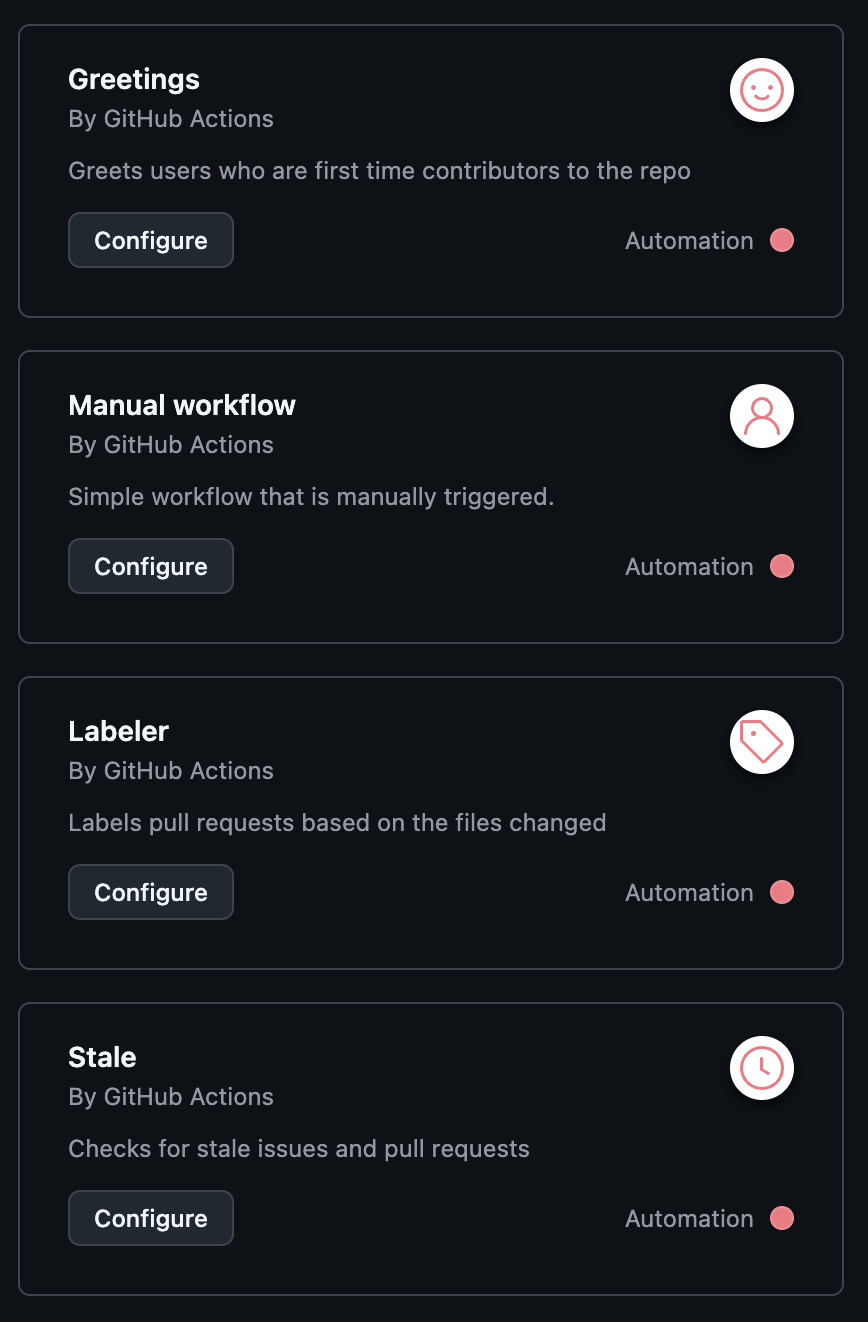
Right out of the box, they provide you with template and workflows that you might use for the respective repo. There are multiple starter template workflows that can help you perform the required automations or build CI/CD pipelines.
Apart from starter templates, you can find huge collection of workflow that can perform various task like storing artifacts, generating an amazing landing page from you README.md file and deploying into GitHub Pages and even some crazy stuff like generating a snake that can eat your GitHub contributions (like the one below)…


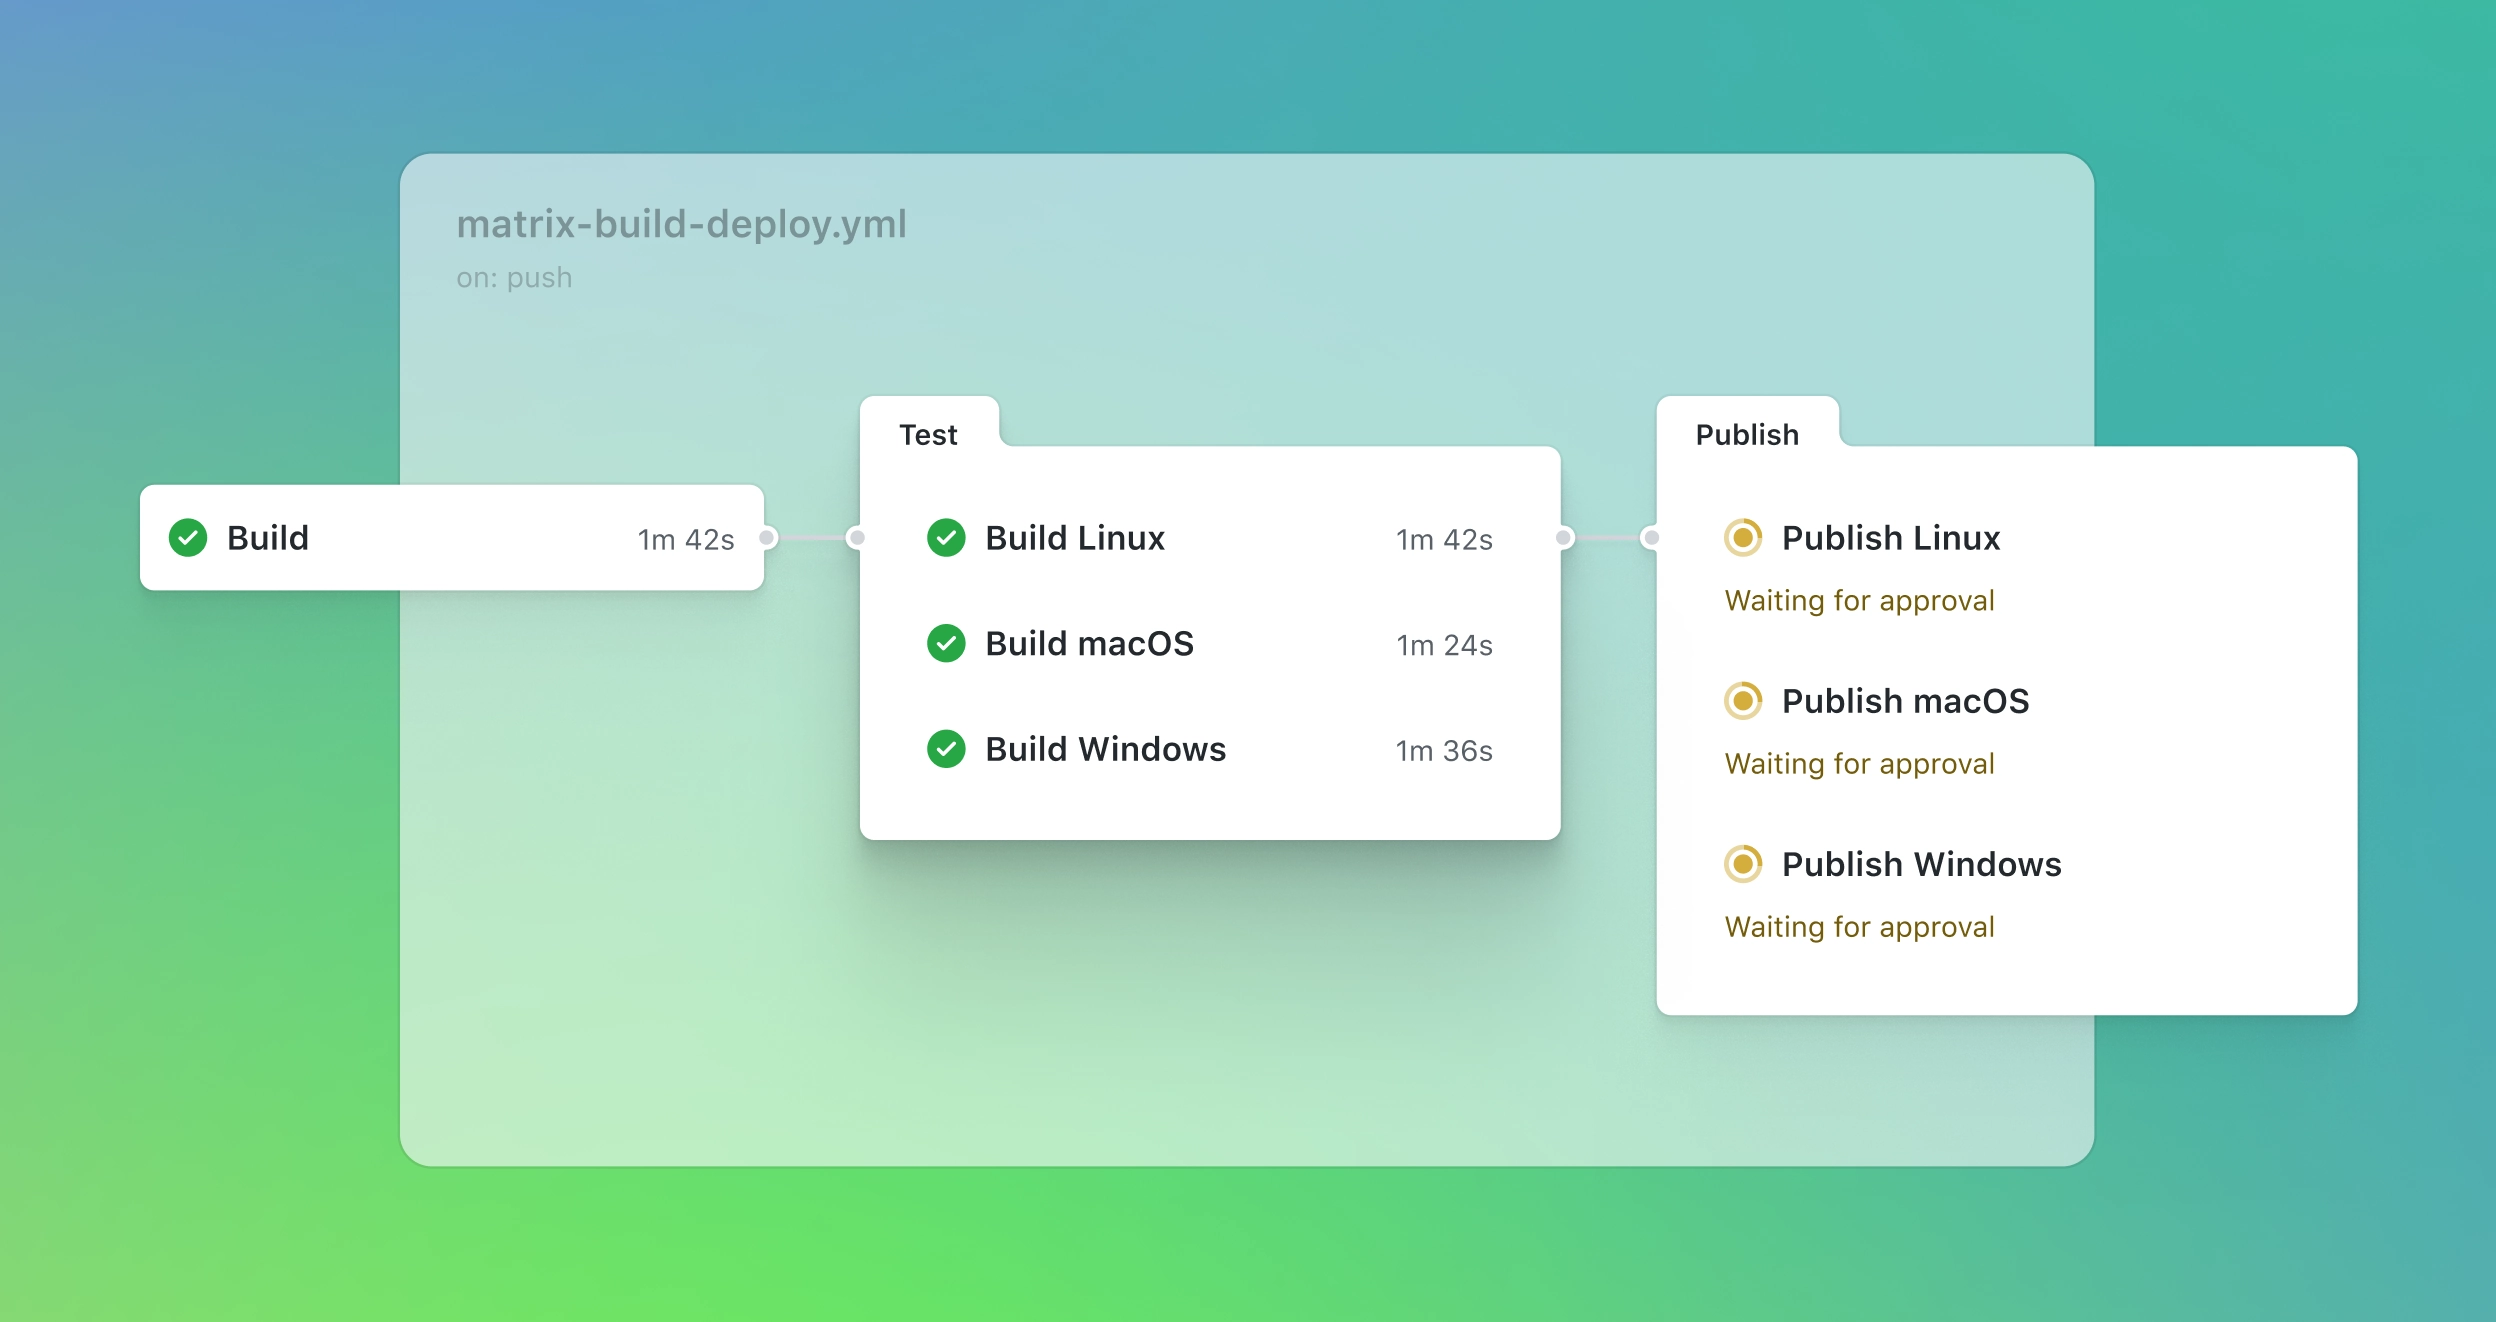
4) Powerful Matrix
GitHub Action comes with a powerful matrix build mechanism and it’s easier than you think. The martix build mechanism is a way to test, build and even deploy your application across different operating systems with different version (or) even test using different runtime environment with different versions.
Yes, I know it not unqiue to GitHub and even other solutions which are similar to GitHub Action also has matrix build mechanism. But GitHub Actions makes it much more easier to define and understand these martix build workflows, and that’s what makes it unqiue.
Here’s an example of GitHub Action workflow that uses matrix build to perform testes with different version,
1
2
3
4
5
6
7
8
9
10
11
12
13
14
15
16
17
18
19
20
21
22
23
24
25
26
27
28
29
30
31
name: CI

on:
  push:
    branches:
      - main
  pull_request:
    branches:
      - main

jobs:
  test:
    runs-on: ubuntu-latest
    strategy:
      matrix:
        node-version: [14, 16, 18, 21]

    steps:
      - name: Checkout code
        uses: actions/checkout@v2

      - name: Set up Node.js
        uses: actions/setup-node@v2
        with:
          node-version: ${ { matrix.node-version }}

      - name: Install dependencies
        run: npm install

      - name: Run tests
        run: npm test
Here’s an close equvalent with jenkins,
1
2
3
4
5
6
7
8
9
10
11
12
13
14
15
16
17
18
19
20
21
22
23
24
25
26
27
28
29
30
31
32
33
34
35
36
37
38
39
40
41
42
43
44
45
46
47
48
49
50
51
52
53
54
55
56
57
58
59
60
61
62
pipeline {
	agent { label 'ubuntu' }

	triggers {
		// This will trigger the job on SCM changes to the main branch
		githubPush() // Requires the GitHub plugin to be installed
	}

	stages {
		stage('Checkout Code') {
			steps {
				script {
					// Checkout the correct branch based on the event type
					if (env.GIT_BRANCH) {
						git branch: env.GIT_BRANCH, url: '<repo-link>'
					} else {
						git branch: 'main', url: '<repo-link>'
					}
				}
			}
		}

		stage('Test') {
			matrix {
				axes {
					axis {
						name 'NODE_VERSION'
						values '14', '16', '18', '21'
					}
				}
				stages {
					stage('Setup Node.js') {
						steps {
							script {
								// Set up the Node.js environment
								env.PATH = "${tool("NodeJS ${NODE_VERSION}")}/bin:${env.PATH}"
							}
						}
					}

					stage('Install Dependencies') {
						steps {
							sh 'npm install'
						}
					}

					stage('Run Tests') {
						steps {
							sh 'npm test'
						}
					}
				}
			}
		}
	}

	post {
		always {
			echo 'Pipeline completed.'
		}
	}
}
5) All In One Solution
GitHub Action can be considered all-in-one solution for the most part. The core of GitHub is the VCS management but yet it provides with many other great features like artifacts for limited storage, GitHub pages for static site hosting, GitHub Action that can provide full end-to-end automation, testing, building and deployment which is compatable with almost all cloud service providers along with option of self-hosting runners.
GitHub offers complete enterprise level management over your application, from implementing very foundational aglie practises using GitHub projects to complete deployment and maintance of your application. This is what make GitHub unqiue from all other platforms and one of the core tool required for such task is GitHub Actions.

Ok enough bragging about GitHub Action, let’s get more technical…
Terminology
Let’s start understanding “how to use GitHub Action” by the terminology used within GitHub Actions…
Please note that, I have provided more information for each of these terminologies. This is to provide you with more insights about that particular thing. These additional insights/characterics discussed within this section are NOT explained within this blog, so please checkout GitHub Docs for more example.
I just want this blog to help you kickstart your journey with GitHub Actions, but not to explain each and everything that is already been documented within GitHub Docs. So, I suggest you to check on GitHub docs after going though this friendly introductory blog.
1) Workflow
Workflow is a simple YAML/YML script/configuration you write describing the respective action/task needed to be performed by GitHub Action. Each workflow does ONE and ONLY task… it can be performing linting, formatting and pushing back the code, building it, deploying, anything but ONLY ONE specific task.
It’s important to place all your workflow within
.github/workflow/directory for GitHub Action to recognize your workflow and work as expected. So, create the.github/workflow/directory within your project/repo to place your workflow files.
Note that these all of these workflows will run parallely by default. But running parallely is not always a good thing… Say, for example you pushed some code to your repo and the workflow started building and deploying, but you just pushed some more code and now there are two instance of the same workflow deploying your content causing more issues.
That can be avoided though concurrency property and you can read about that on GitHub Docs a bit later. For now, let’s focus on understanding the terminology and other core concepts.
2) Runner
Runner is basically the server that runs your workflow. GitHub provides you with a default runner to execute your workflow, but you can also self-host your own runner to reduce the costs or to handle thing on your own.
Yes, GitHub Action is mostly a paid service. But each and every GitHub user has a FREE but limited plan and most of the times it’s more than enough for most of the devs (especially for the beginners). For more details, you can check on billing section on GitHub Docs.
3) Job
A Job is an isolated environment where the specified set of instructions get executed within a dedicated runner. Note that a single workflow is made of one or more job(s).
Multiple jobs within a workflow runs parallely by default, but if you want to chain them, then you can use the
needsproperty. Since all jobs are isolated, no data is shared from one job to another. But if you intend to send some data then you need to make use of$GITHUB_OUTPUTenv variable. You can check on GitHub docs for more information.
4) Step
A Step is a single very specific instruction that perform only one given atomic task. A job is made up of one or more step(s). Each step can share data from one another as they are present within the same runner instance.
Note that each step is executed in a serial manner (i.e., one after another) within a job. If any of the step failed due to any reason, remaining steps will be skipped by default and the whole jobs fails making the whole workflow fail.
You can avoid it by setting
continue_on_errortotrue(or) by using status check functions likefailure()oralways(). And again, you can check on GitHub docs for more information.
5) Events/Trigger
A Event is an incident that is occured due to an action perform by an external entity. It’s also know as the trigger of the workflow. When an user does something like create a pull request or merged the pull request or anything else, an event is generated which triggers/starts the execution of the workflow(s).
We can access more infomation about the event generated, within the workflow thought environmental variable
github.events.
Structure of a Workflow
Now that were solid with the terminology, let’s go ahead and take a look at the stucture of a workflow to understand the very fundamentals of GitHub Action that can help you break down from simple to very advance workflows.
Consider the following workflow,
1
2
3
4
5
6
7
8
9
10
11
12
13
14
15
16
17
18
19
20
21
22
name: Hello World

on:
  workflow_dispatch:

jobs:
  say-hello:
    runs-on: ubuntu-latest

    steps:
      - name: Print Hello World
        run: echo "Hello world"

      - name: Print My Message
        run: echo "This is my first workflow"

    say-bye:
      runs-on: ubuntu-latest

      steps:
        - name: Print Good bye
          run: echo "Good bye"
Now, let try to understand the structure from the above example…
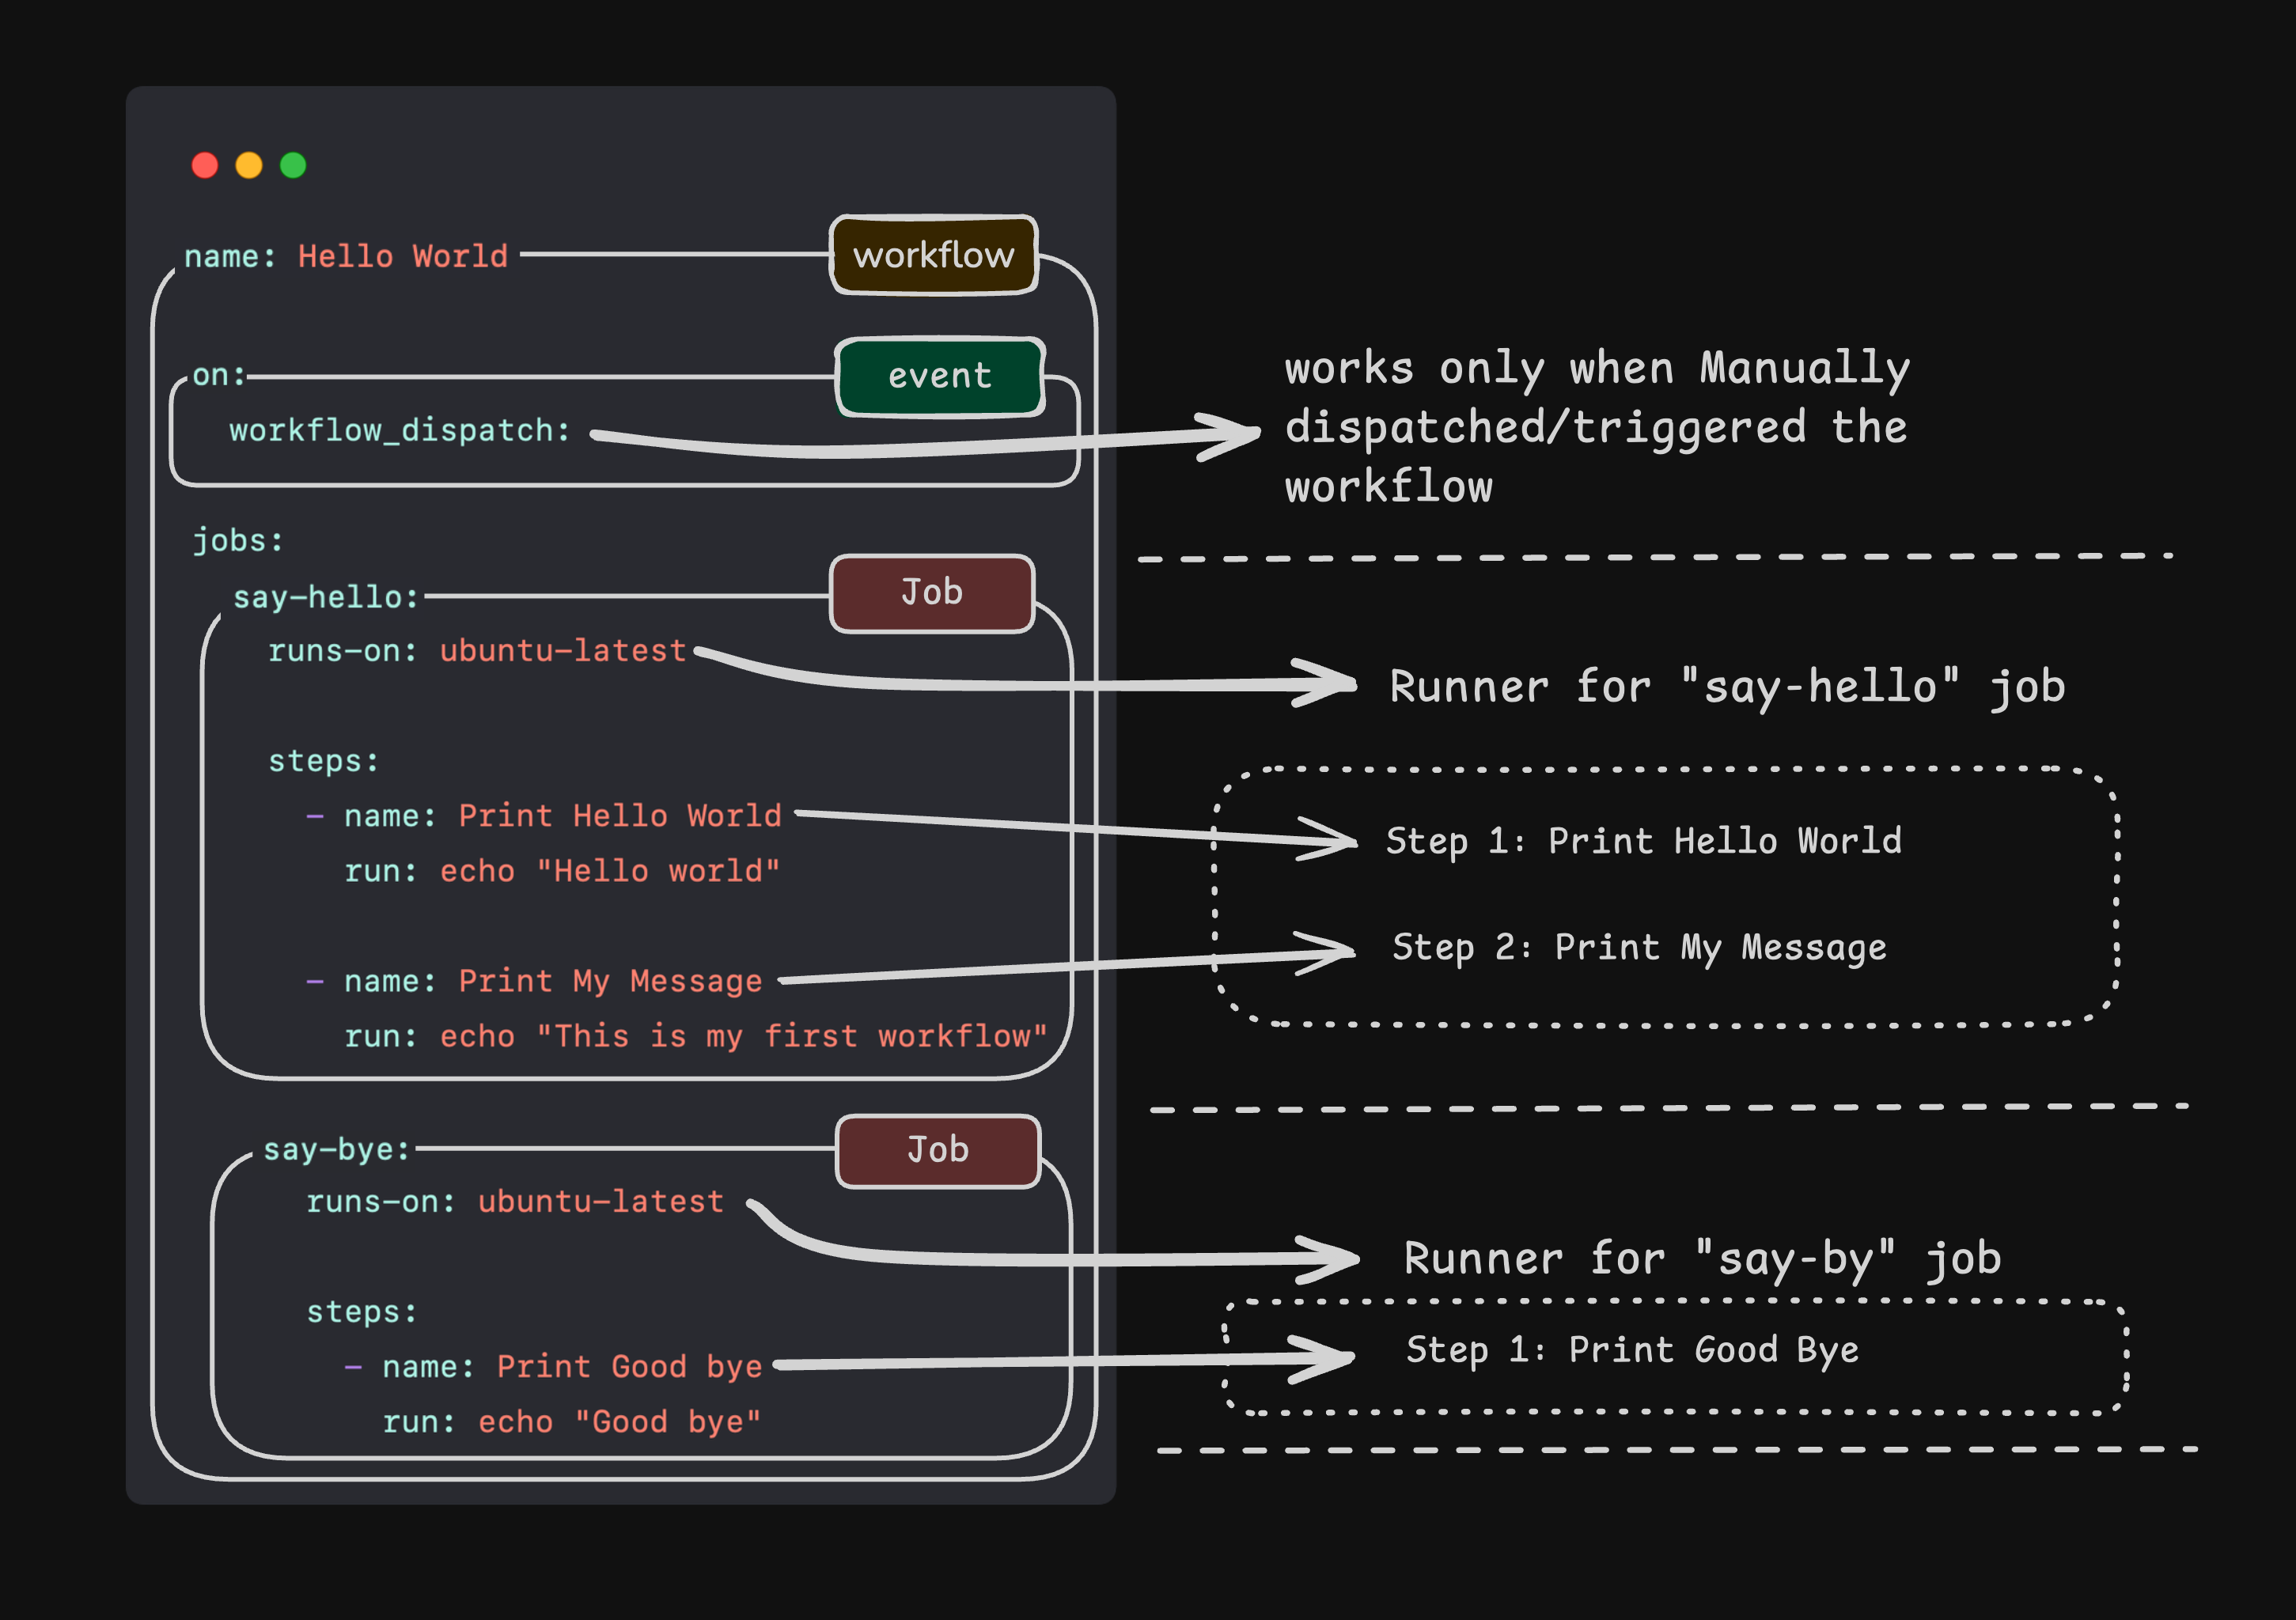
From the above diagram, we can see how the workflow is structured and what does each section do. Let’s start from the very beginning,
Title of the workflow: The
nameproperty defined at the very beginning of the workflow defines the name of the workflow and for this workflow it is “Hello World”Event: The event are the ones which trigger the workflow and to define these trigger we use
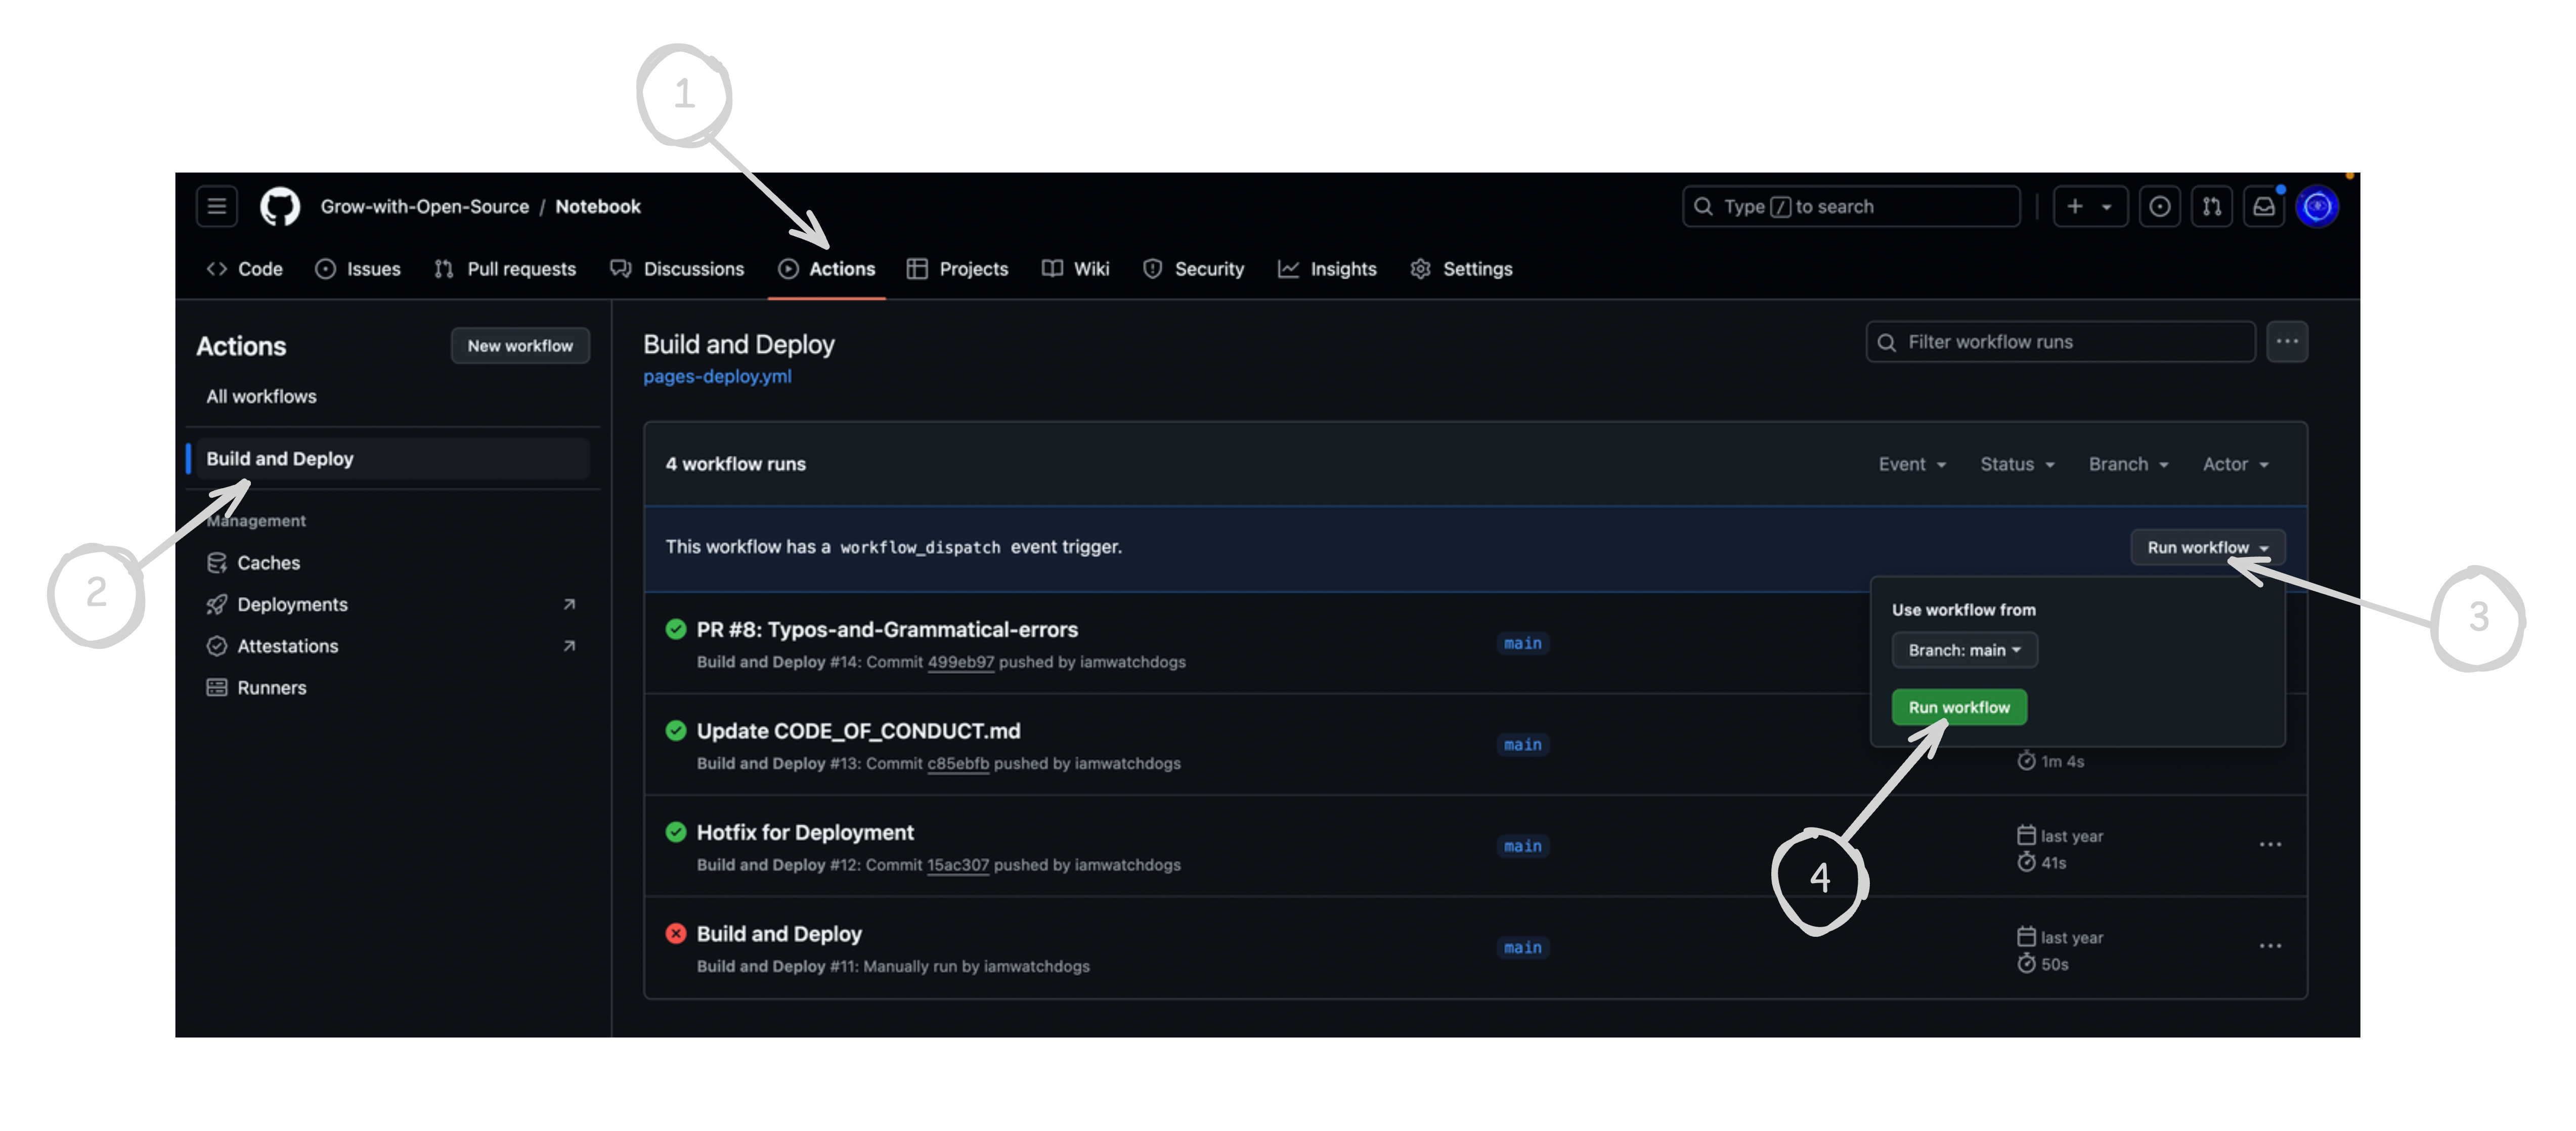
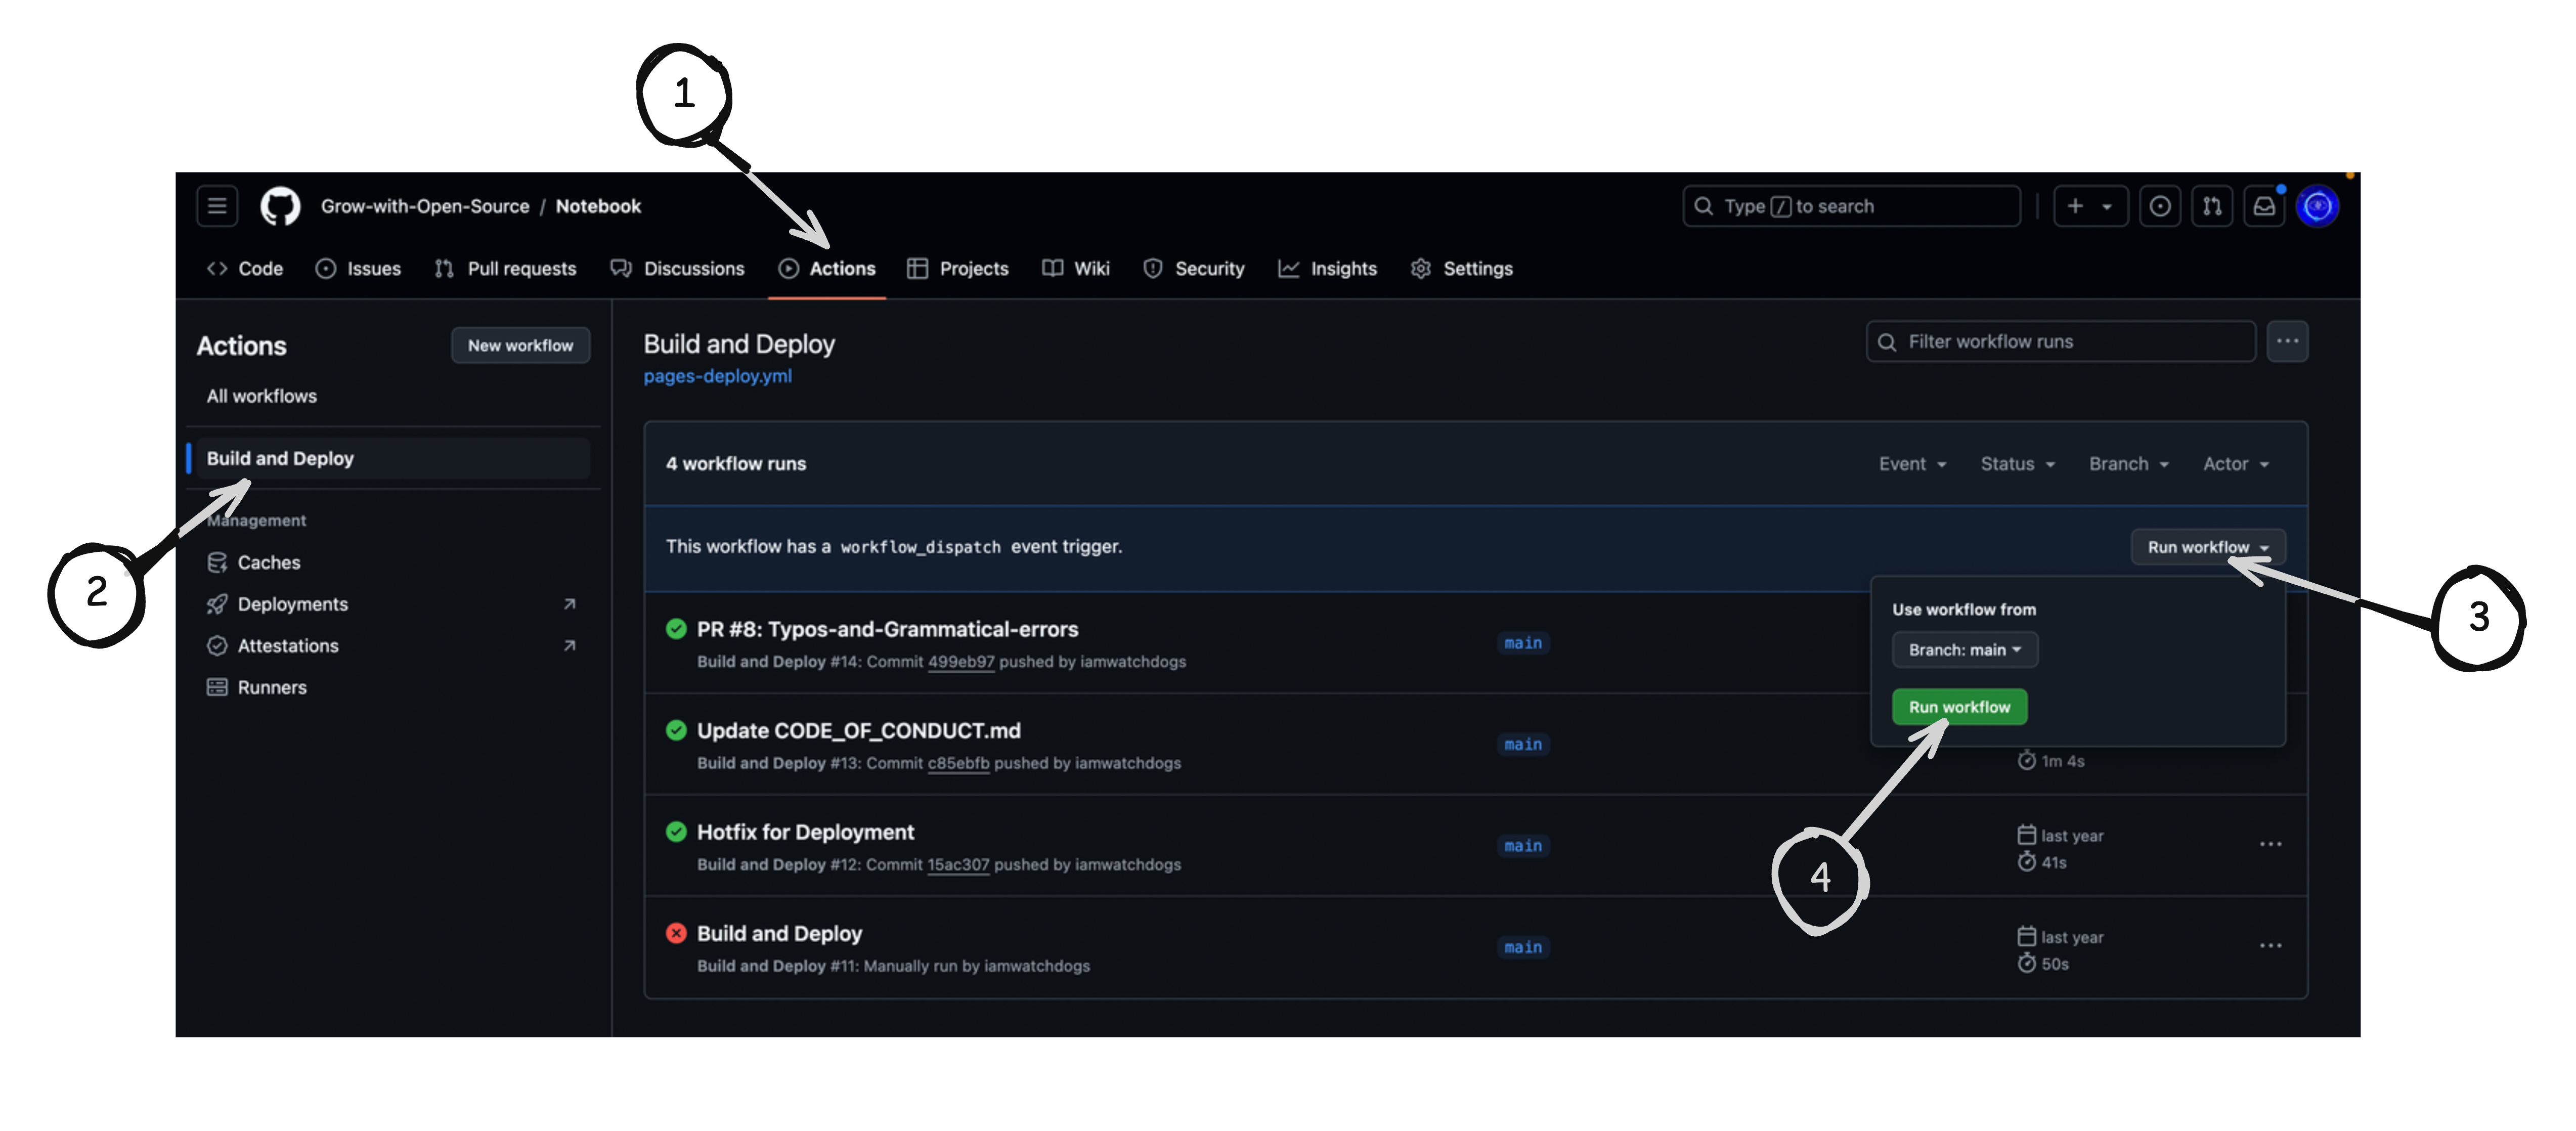
onproperty. When we take a look at the above workflow we can see that the event trigger is set toworkflow_dispatchwhich says that this workflow should only execute when a user explictly trigger the workflow to get executed. And to trigger this workflow we can click Run workflow button on you Actions Tab as show below,
- “say-hello” job:
say-hellois the job which is defined first within the “Hello World” workflow, but note that they both will be executing parallely since we didn’t chain it withsay-byejob.1 2 3 4 5 6 7 8 9
say-hello: runs-on: ubuntu-latest steps: - name: Print Hello World run: echo "Hello world" - name: Print My Message run: echo "This is my first workflow"
This job run on Ubuntu runner with 2 steps that are executing serially (i.e., one after another). The first step is named as “Print Hello World”, in this step we run the command
echo "Hello world"on the runner’s shell. Thus printing the words “Hello world” on to the console of the runner. Since the first set was a success, the runner proceed to execute the next step which is named as “Print My Message”. In this step there, we’re telling runner to execute the commandecho "This is my first workflow"on its shell. Similar to the first step this step print the given message to the console. Since both steps executed successfully, the job ends with a success status. - “say-bye” job:
say-byeis another job which is defined aftersay-hellojob, but I you understand that these two are executing parallely as we didn’t useneedskeywords to chain them and make the execution serial.1 2 3 4 5 6
say-bye: runs-on: ubuntu-latest steps: - name: Print Good bye run: echo "Good bye"
The
say-byejob has only one step i.e., “Print Good bye” and all it does is runs theecho "Good bye"command on the dedicated runner forsay-byejob. And since the one and only step has executed successfully, the whole job is succussful. - Since both Job exected successfully, the whole workflow is ended with a success status.
Here’s the snippet of
say-byejob if you want to chain it withsay-hellojob,
Now, only after the
say-hellojob is finished successfully, it will proceed tosay-byejob. Note that if thesay-hellojob somehow fails, thensay-byeis skipped by default and whole workflow will end with failure as status.
Real-world Example
Now that we’re comfortable with terminology and structure of a basic GitHub Action workflow, let’s proceed and create a linting workflow which is generally used as a part of CI workflows in real world scenarios.
Before we begin
I want to keep things simple while trying to cover as many fundamental things as possible, so I’m decided to go with linting workflow as real-world example. It might not be the whole CI workflow many major projects, but it’s still part of it.
As I’m writing this blog for very beginners, I going forward to lint the Javascript projects as majority of people might be familiar with it. Since many beginners might have worked on small projects with basic HTML, CSS and JavaScript, I have reworked the linting workflow from one the repos and I’m going to explain that.
I’m also aware that many people might have started using some libraries/frameworks like React/Angular, I’ll be modify the workflow at the end to encourage those people too. Keeping these things on mind, let’s proceed…
Note that we’ll be working on this workflow under the assumption that you already have a Javascript project ready with you. If you’re working on it right now, all you need to do is make sure you have some JavaScript files on your project/repo.
What is Linting ?
Sorry for hitting the brakes, but we should not rush into example without understanding why we need them in the first place. So, I’m gonna keep it simple and say that linting is just a small syntax checking system that not only checks for syntax but also best practises and some standard coding style to maintain the integrity of the whole project.
These linting workflow make sure that our code successfully runs and also helps us follow best practises which encourages other devs to read, understand, appreciate and maybe even contribute to your source code.
Now that we know what’s linting, why do we need and stuff. let’s jump right no to the example.
Writing workflow
Ok, let’s start by creating a new YAML file using extension .yml with any suitable name under the directory (or folder) .github/workflow/. If you don’t have .github directory within your project/repo create the directory and create another directory with name workflow within the .github directory.
1
2
3
4
5
6
7
# Note these are bash command for people using Linux/Unix based systems

# Creating `.github/workflows` directory if not present
mkdir -p .github/workflows

# Creating workflow file
touch .github/workflows/lint.yml
Now that we have created the workflow file, let’s start by writing basic thing we know till now…
1
2
3
4
5
6
7
8
9
10
11
12
13
14
15
16
name: Linting

on:
  push:
    branches:
      - main
  pull_request:
    branches:
      - main

jobs:
  lint:
    runs-on: ubuntu-latest

    steps:
      - name: This the basic workflow we learn till this part
Since you have followed the blog from the beginning, you might understand what’s happening here. I’ll break it down for you anyways,
- we name the workflow as “Linting”.
- we defined the events telling the GitHub Action to trigger the workflow when,
- A pull request is made from any branch to
mainbranch. - Code (to be specific, commits) being pushed to
mainbranch.
- A pull request is made from any branch to
- we defined a job named as
lint. - the
lintjob runs on ubuntu latest version runner instance. - currently, the
lintjob has only one step and we named it as “This the basic workflow we learn till this part”.
Now that we are caught with everything, let’s optimize it a bit…
Optimize events
Since we are working with JavaScript files, we want this workflow to trigger only when an JavaScript file is added/removed/updated/modified. In other words, we want it to trigger only for files that end with .js extension.
So, let’s be more specific on the events that trigger the workflow…
1
2
3
4
5
6
7
8
9
10
11
12
13
14
15
16
17
18
19
20
21
22
name: Linting

on:
  push:
    branches:
      - main
    paths:
      - '*.js'
      - '**/*.js'
  pull_request:
    branches:
      - main
    paths:
      - '*.js'
      - '**/*.js'

jobs:
  lint:
    runs-on: ubuntu-latest

    steps:
      - name: This the basic workflow we learn till this part
Awesome, now that we’ve specified the paths property, we are explicitly saying GitHub Actions to look out only for the files that ends with .js extension. This optimization ignore any kind of changes made to your non-js files, like README.md and so, thus saving lots of limited runner time given to our free tier.
In case you’re wonder what’s
*.jsand**/*.jsmeans, they are actually regular experssions which says the following,
*.jsmeans that any files that ends with.jsletter.**/*.jsmeans that any files that ends with.jsletter but from any kind of file hierarchy.
If you’re concerned about the limitation of your GitHub Action free tier, you can check the details on the offical page. But as I have mentioned earlier in the blog, you don’t have to worry about it as your just getting started with GitHub Actions.
And if you’re worked with YML/YAML script before, then you might we write them into array instead of each invidual item…
1
2
3
4
5
6
7
8
9
10
11
12
13
14
15
16
17
name: Linting

on:
  push:
    branches: [main]
    paths: ['*.js', '**/*.js']
  pull_request:
    branches: [main]
    paths: ['*.js', '**/*.js']


jobs:
  lint:
    runs-on: ubuntu-latest

    steps:
      - name: This the basic workflow we learn till this part
Checking out your repo
Now that we have a base workflow and even optimized it, let’s go ahead and do the first thing which you might find come in 95% of workflows i.e., checking out your repo. Checking out the repo is the standard way of cloning your repo into the runner so that we can perform various task like linting, building, deploying, etc.
Now, go ahead and search for checkout workflow that is officially pubished by GitHub on marketplace and click the the one that comes first on the search results, just as shown below.

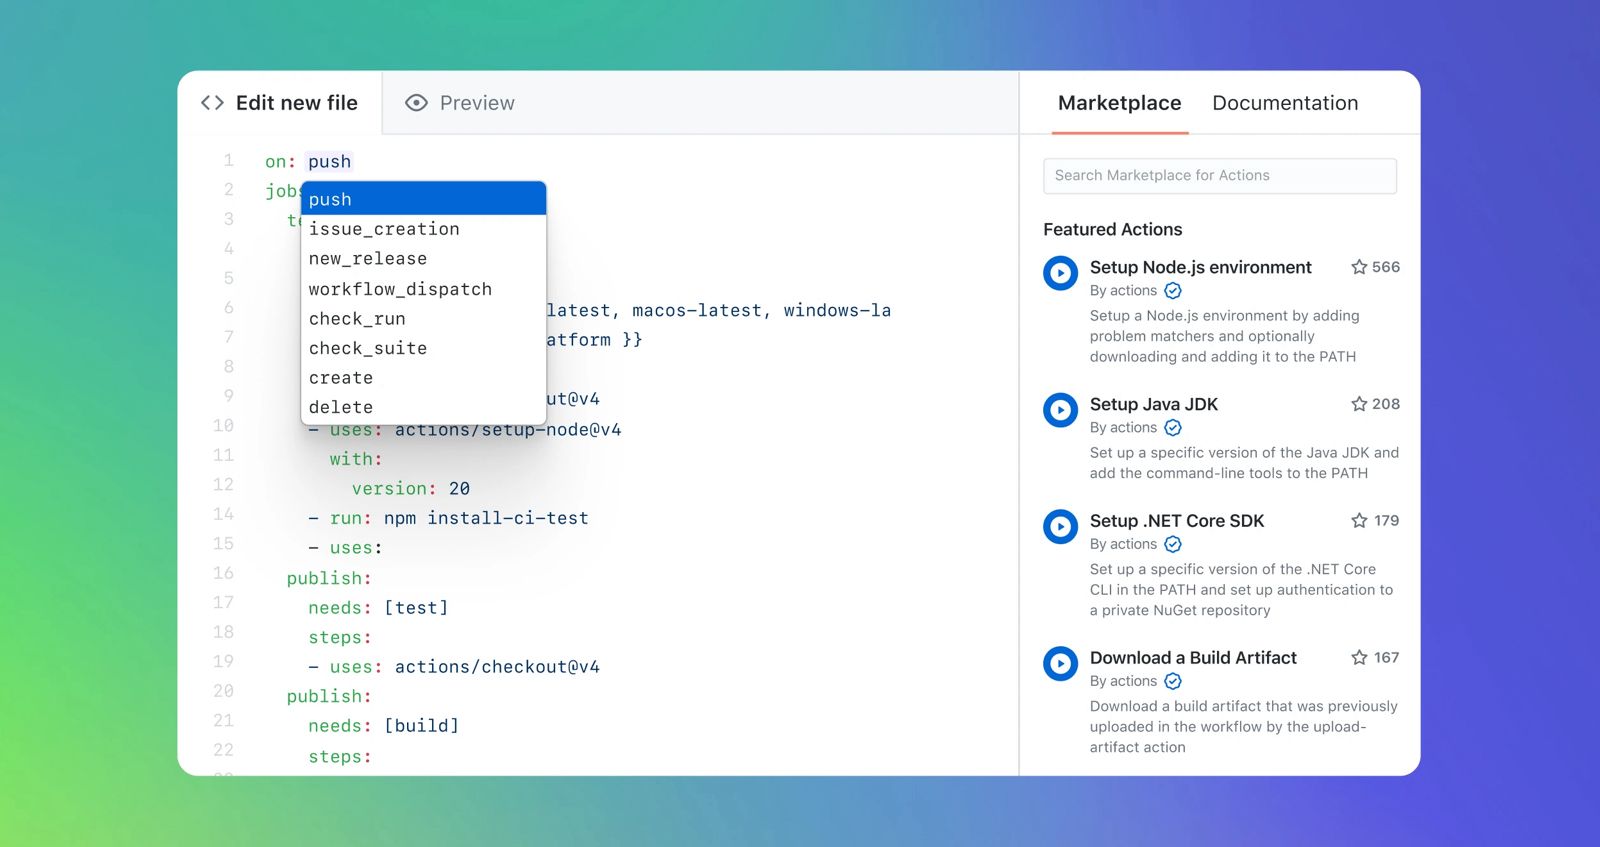
if you’re writing this workflow directly on your repo, then you can make use of the
marketplacesection you can find on the right side of your editor.Note that I’m writing this blog under assumption that you’re following this whole workflow from scratch from your IDE and not thought GitHub editor.
I’m not stopping you from using the GitHub editor, in fact, I suggest to use the GitHub editor for writing workflows due to all the features. But as of now, I’m doing under the assumption that your writing this workflow thought your IDE.
Now that we have selected the first option, we got kinda big description/config under the Usage section as shown below,
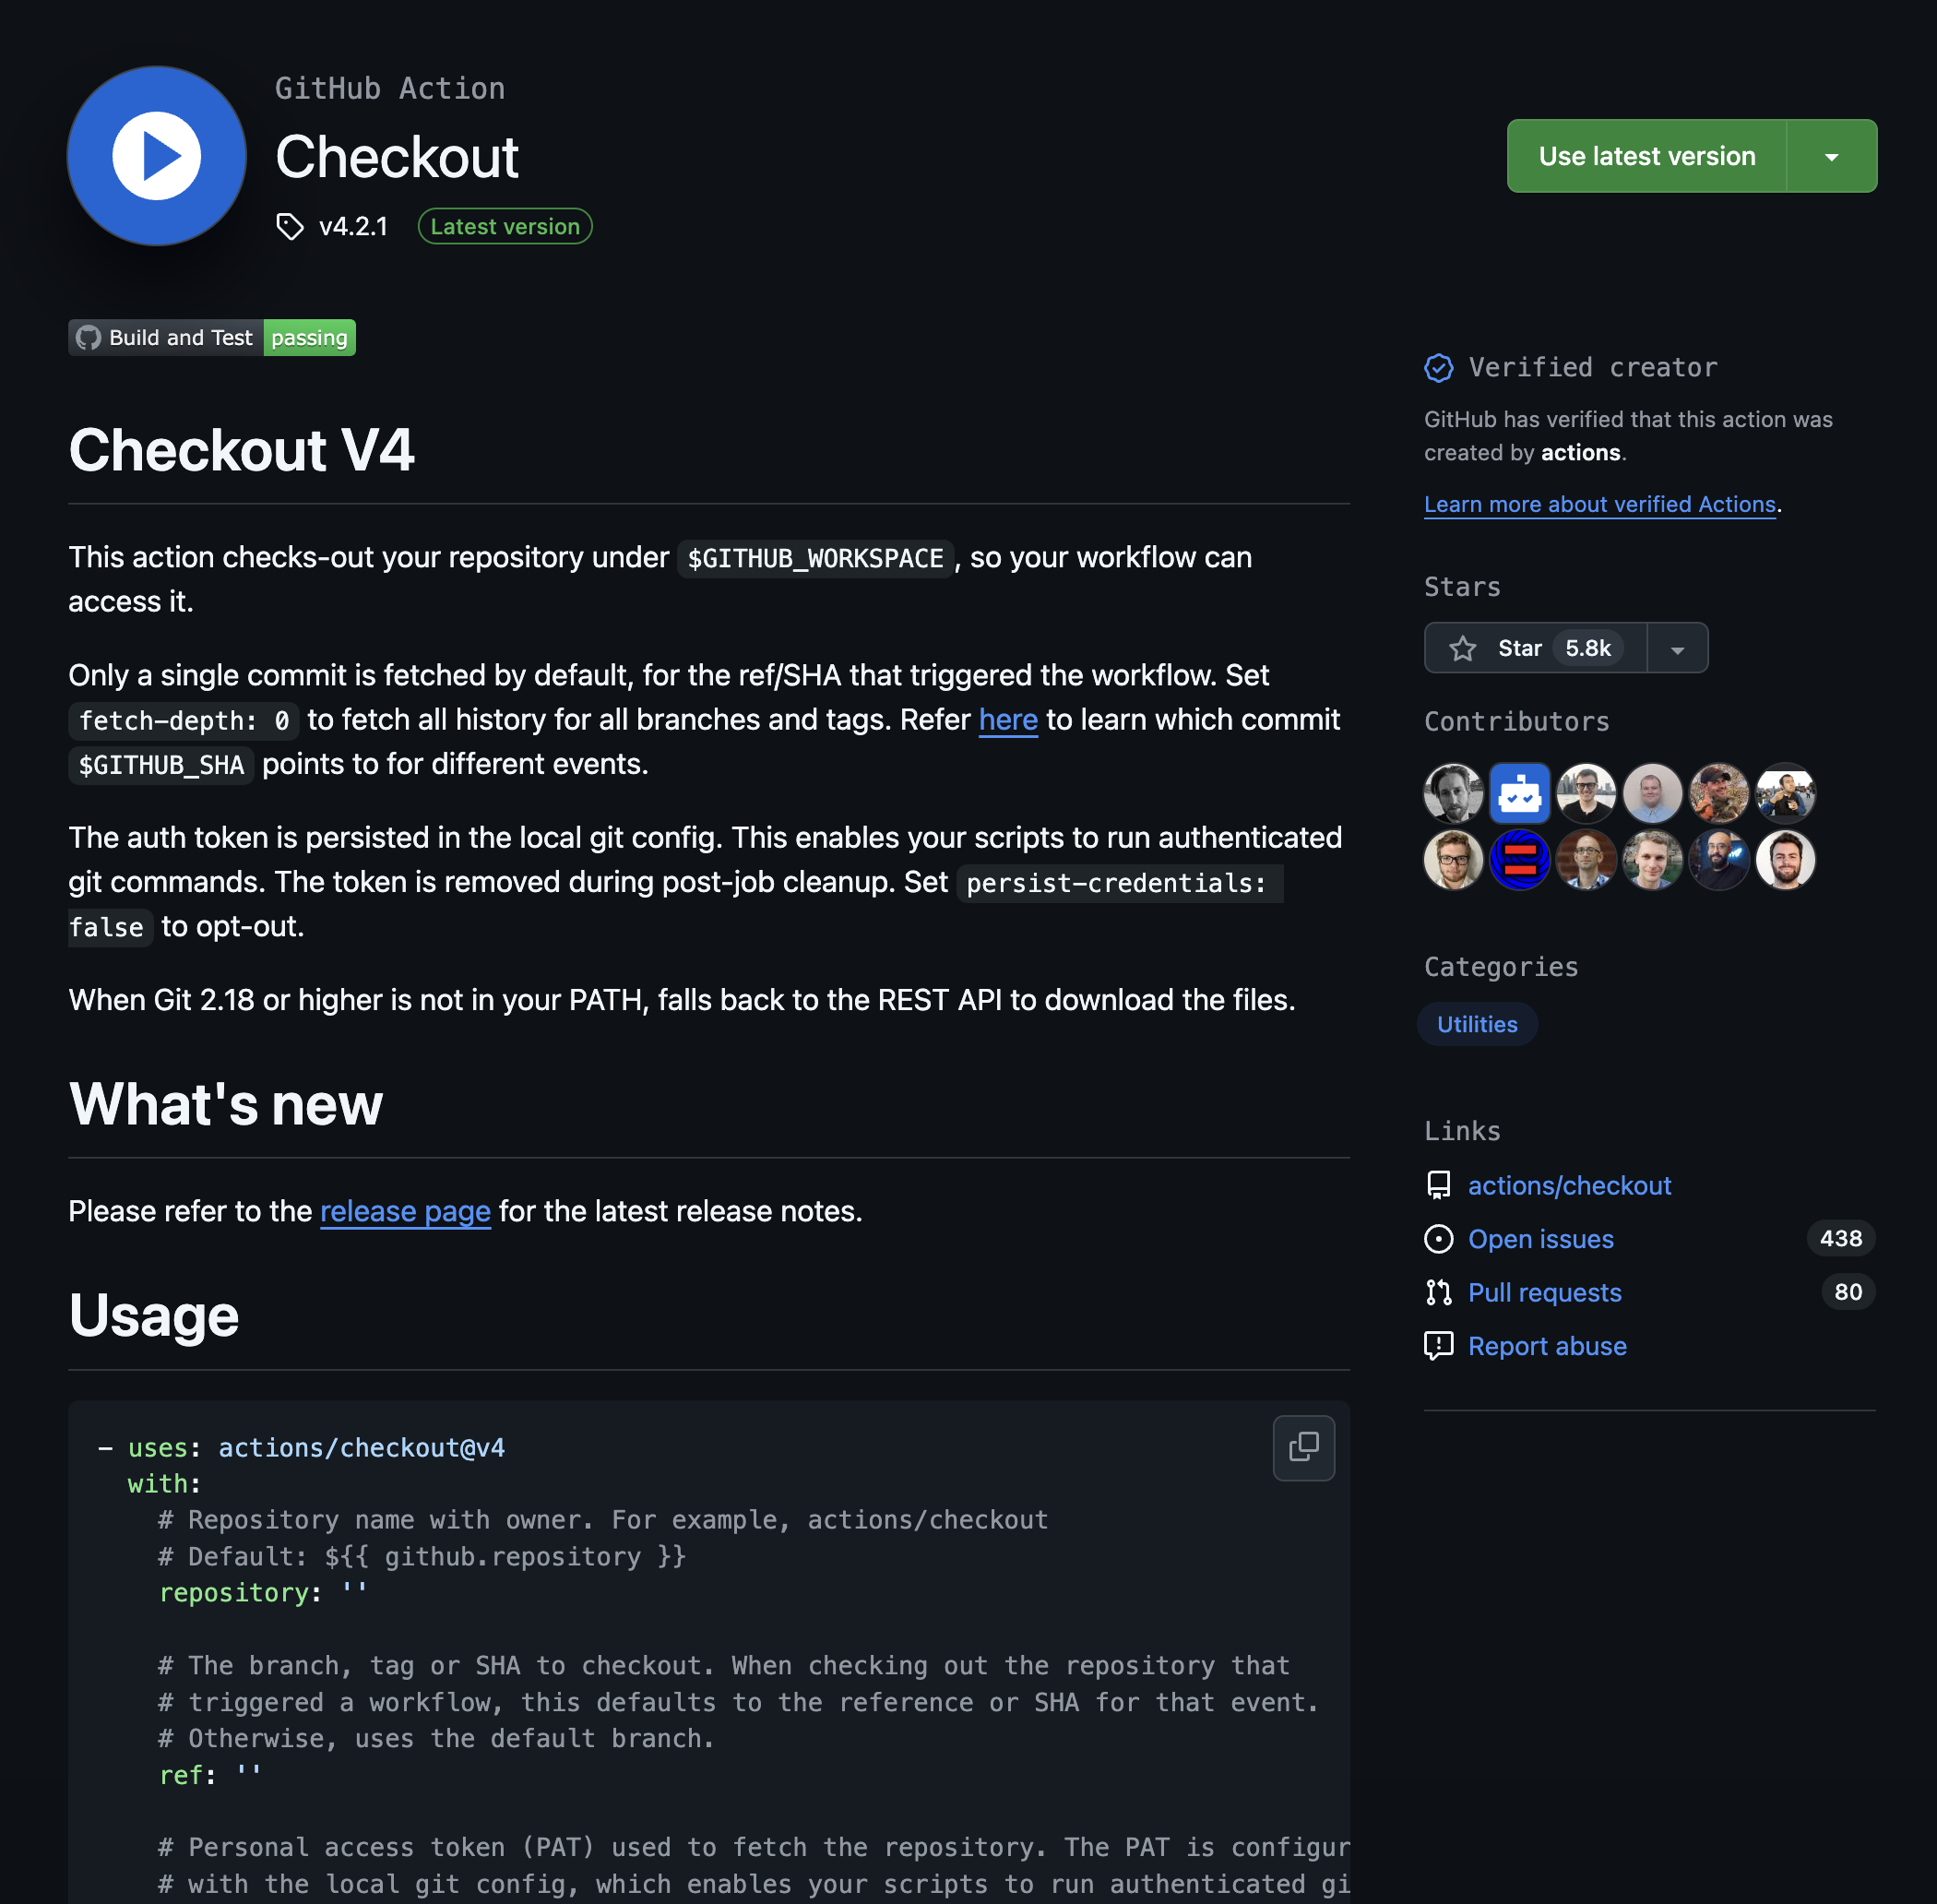
These are all the option they provide you with so that you can have more control over the way you want to clone your repo into the runner. But as of now, we’re only concerned with simple cloning of our repo into the runner, so all we need to do is copy the uses part and added them as a step into your lint job.
1
2
3
4
5
6
7
8
9
10
11
12
13
14
15
16
17
18
name: Linting

on:
  push:
    branches: [main]
    paths: ['*.js', '**/*.js']
  pull_request:
    branches: [main]
    paths: ['*.js', '**/*.js']


jobs:
  lint:
    runs-on: ubuntu-latest

    steps:
      - name: Checkout repo
        uses: actions/checkout@v4
Great, now we have succesfully checked the repo into the runner instance created for the lint job.
Linting
Now that we have checked out the repo, let’s start working on the linting logic. Before we proceed, let’s make a few things clear,
- As I have said eariler, we’re working JavaScript project i.e., good old (HTML + CSS + JS) Projects.
- And please note that we’re building this workflow under assumption that your project is NOT build upon any template generated by a libraries/frameworks like React/Angular (we’ll there soon).
- In case your project is somehow build around
npmenvironment, then there’ll be slight changes and by the end of this blog you might be able to make the required changes all by yourselves.
Now that we are clear with what we’re working on, let’s see how we are going to write the lint steps…
Before I proceed with my approach, I want you to know that there is a simple & direct solution instead of configuring our own linter. It’s called Super-Linter and it supports multiple languages and it’s as simple as checking out your repo just as shown below,
But, I want you to dig a bit deep into GitHub Action and get your hands dirty instead of looking for a easier solutions (Atleast during your first few days with GitHub Actions). And just so you know, super linter internally uses eslint (the one which we’re going to us in our workflow) to perform linting for JavaScript files, you check out it’s source code.
Here’s my approach,
We start by creating npm environment within project, which means we’re going to need node.js within our runner. Then we install eslint as it’s one of the popular linting tool out there. Now we write our linting configuration for eslint within the runner instance itself. And finally, we perform linting using npx eslint.
Let me create a checklist out our approach,
- Install Node.js
- Create
npmenvironment - Install Eslint
- Configure Eslint
- Perform linting
Easy right ???… Let’s check them one by one…
Installing Node.js
Firstly, we need to install Node.js into our Runner to create an npm environment. So, we go back to the marketplace and grab what need. Let’s search for Node.js and vola there it is…

Now that we have found out action, let’s set up the basic required node environment and basic config required is the version of node and as of I’m going with the latest LTS version to this date i.e., 20.
1
2
3
4
5
6
7
8
9
10
11
12
13
14
15
16
17
18
19
20
21
22
23
name: Linting

on:
  push:
    branches: [main]
    paths: ['*.js', '**/*.js']
  pull_request:
    branches: [main]
    paths: ['*.js', '**/*.js']


jobs:
  lint:
    runs-on: ubuntu-latest

    steps:
      - name: Checkout repo
        uses: actions/checkout@v4

      - name: Setup Node.js
        uses: actions/setup-node@v4
        with:
          node-version: 20
Nice, now we can use npm to create the environment to install eslint to perform linting. Let’s update out check list,
- Install Node.js
- Create
npmenvironment - Install Eslint
- Configure Eslint
- Perform linting
Installing Eslint
Let’s go ahead and install create npm environment, so that we can install eslint. And to all of that we need to run a few commands as following,
1
2
3
4
5
6
7
8
# initalizing an npm environment (with default config)
npm init -y

# installing eslint and other required dependencies
npm install eslint @eslint/js globals --save-dev

# creating an empty eslint config file (so that we can configure it later)
touch eslint.config.cjs
We are installing other dependencies like
@eslint/jsandglobalsso help us with our configuration. Here’s small info about these dependencies,
@eslint/jsis a plugin of eslint tool which is basically a set of configuration that are preconfigure for us, so that we can extend our basic configuration with all the standard configs without defining everything from scratch.globalsis basically a JSON file with set of global variables from different runtime environment. Eslint 8 or eariler verison had these thing saved within their evn files, but from Eslint 9 or later version we have to use external dependencies like this one.If you’re wondering what is
.cjsmean, just know that it a way of saying it’s a JavaScript file that follows CommonJS syntax for import & export format.
Great, let’s add them as a single step into our workflow,
1
2
3
4
5
6
7
8
9
10
11
12
13
14
15
16
17
18
19
20
21
22
23
24
25
26
27
28
29
name: Linting

on:
  push:
    branches: [main]
    paths: ['*.js', '**/*.js']
  pull_request:
    branches: [main]
    paths: ['*.js', '**/*.js']


jobs:
  lint:
    runs-on: ubuntu-latest

    steps:
      - name: Checkout repo
        uses: actions/checkout@v4

      - name: Setup Node.js
        uses: actions/setup-node@v4
        with:
          node-version: 20

      - name: Install Eslint
        run: |
          npm init -y
          npm install eslint @eslint/js globals --save-dev
          touch eslint.config.cjs
Nice, we have installed the eslint and all we need to do is configure eslint so that we can perform our linting. Let’s update the check list,
- Install Node.js
- Create
npmenvironment - Install Eslint
- Configure Eslint
- Perform linting
Configuring Eslint
Now that we got all the dependencies installed, let’s go ahead and configure eslint…
If you have used eslint previously, you might be able to write the configuration on your own. But I’m going under assumption you haven’t heard of eslint in your life and proceeding with configuring eslint for our linting workflow. Here’s the configuration we’ll be using to perform the linting. Take a good look at it before I explain you what it does…
1
2
3
4
5
6
7
8
9
10
11
12
13
14
15
16
17
18
19
20
21
22
23
24
const js = require('@eslint/js');
const globals = require('globals');

module.exports = [
  {
    ignores: ['**/*.min.js'],
  },
  js.configs.recommended,
  {
    languageOptions: {
      ecmaVersion: 'latest',
      sourceType: 'module',
      globals: {
        ...globals.browser,
        ...globals.es2021,
        ...globals.node,
      },
    },
    rules: {
      'no-undef': 'off',
      'no-unused-vars': 'off',
    },
  },
];
Here’s the explaination,
- The required statements: The first two line in the configuration are two required statements that import the eslint plugin
@eslint/jsand a JSON fileglobalswhich we have installed in the previous step.1 2
const js = require('@eslint/js'); const globals = require('globals');
module.exports: Themodule.exportsis a way to export things in CommonJS format. And in this config, we are export an array of object where each object represents a configuration.ignoreproperty: The first config object is an simple config which is an array of paths that the eslint needed to ignore. The only value it has is the path**/*.min.jswhich basically are the standard javascript file(s) which is/are bundled into highly optimized file that are typically used as external libraries (or) production build.js.configs.recommended: This is the preconfigured configs that we have imported from eslint plugin@eslint/jsand this config handles all the standard and recommended configurations thus saving us time. It does most of the job trying to find issues like syntax errors and stuff…languageOptions: ThelanguageOptionsis part of last config object which define the verions and stuff about the language that required to be linted. Let’s look at the specifications,ecmaVersion: This represents the version of ECMAScript language required to use. Here, we’re using the latest version of the language.sourceType: This represents the type of source code. Here, we’re using “module” which is the default value. This means that eslint will parse our code as a module.globals: This is an object that defines the global variables. This is required because eslint doesn’t know about the global variables that are defined in the browser or Node.js. By setting this option, eslint will not complain about undefined variables that are actually defined in the browser or Node.js.
rules: This is an object that defines the rules by which the eslint is supposed to preform linting. As you can see, we have set'no-undef'and'no-unused-vars'asoff. Now, it willing not perform very strict checking and ignores variable which might look undefined to eslint or the variable that are not used.
Now that we have the required config, we need to write these content into the eslint.config.cjs. So, let go back to marketplace and find a action for that. Since we need some action to write content into file, I’m going to search for action that says “write file” and let’s see what we got…

And I’m going with the first option and looks like we hit the jackpot. It’s exactly what we need, a simple action where the only thing we need to specify are the file path, contents, and mode of writing (like override or append kind of stuff).

Let’s go ahead and add this to our workflow and finish configuring our eslint,
1
2
3
4
5
6
7
8
9
10
11
12
13
14
15
16
17
18
19
20
21
22
23
24
25
26
27
28
29
30
31
32
33
34
35
36
37
38
39
40
41
42
43
44
45
46
47
48
49
50
51
52
53
54
55
56
57
58
59
60
61
name: Linting

on:
  push:
    branches: [main]
    paths: ['*.js', '**/*.js']
  pull_request:
    branches: [main]
    paths: ['*.js', '**/*.js']


jobs:
  lint:
    runs-on: ubuntu-latest

    steps:
      - name: Checkout repo
        uses: actions/checkout@v4


      - name: Setup Node.js
        uses: actions/setup-node@v4
        with:
          node-version: 20

      - name: Install eslint
        run: |
          npm init -y
          npm install eslint @eslint/js globals --save-dev
          touch eslint.config.cjs

      - name: Configure eslint
        uses: DamianReeves/write-file-action@master
        with:
          path: eslint.config.cjs
          write-mode: overwrite
          contents: |
            const js = require('@eslint/js');
            const globals = require('globals');

            module.exports = [
              {
                ignores: ['**/*.min.js'],
              },
              js.configs.recommended,
              {
                languageOptions: {
                  ecmaVersion: 'latest',
                  sourceType: 'module',
                  globals: {
                    ...globals.browser,
                    ...globals.es2021,
                    ...globals.node,
                  },
                },
                rules: {
                  'no-undef': 'off',
                  'no-unused-vars': 'off',
                },
              },
            ];
Great, Now we have configured the eslint and all that is left is to perform linting of our project. Let’s update out check list,
- Install Node.js
- Create
npmenvironment - Install Eslint
- Configure Eslint
- Perform linting
Before you proceed, I just want to let you know that, whatever we just did is kinda bad practise. It’s kinda standard for you to have a config file right within your repo/project from the beginning so that other devs understand on what based you’re performing linting (or) any other thing.
But since the we’re working on a very basic HTML+CSS+JS project, I’m willing to go down this path. so that it won’t disturb you project in anyway possible. And maybe look a bit clean depending on how you structure your project’s file hierarchy.
Linting the project
We have reached the end of our goal of linting our JavaScript Project and since we installed eslint thought npm. We have to use npx to use the eslint on the shell and to perform the linting all we need to do is use the following command,
1
2
# Linting all javascript files present within the project
npx eslint .
All we need to do is define another step which execute this command on the shell of the runner, and when we finally added that step, our workflow would look something like this…
1
2
3
4
5
6
7
8
9
10
11
12
13
14
15
16
17
18
19
20
21
22
23
24
25
26
27
28
29
30
31
32
33
34
35
36
37
38
39
40
41
42
43
44
45
46
47
48
49
50
51
52
53
54
55
56
57
58
59
60
61
62
63
name: Linting

on:
  push:
    branches: [main]
    paths: ['*.js', '**/*.js']
  pull_request:
    branches: [main]
    paths: ['*.js', '**/*.js']


jobs:
  lint:
    runs-on: ubuntu-latest

    steps:
      - name: Checkout repo
        uses: actions/checkout@v4

      - name: Setup Node.js
        uses: actions/setup-node@v4
        with:
          node-version: 20

      - name: Install eslint
        run: |
          npm init -y
          npm install eslint @eslint/js globals --save-dev
          touch eslint.config.cjs

      - name: Configure eslint
        uses: DamianReeves/write-file-action@master
        with:
          path: eslint.config.cjs
          write-mode: overwrite
          contents: |
            const js = require('@eslint/js');
            const globals = require('globals');

            module.exports = [
              {
                ignores: ['**/*.min.js'],
              },
              js.configs.recommended,
              {
                languageOptions: {
                  ecmaVersion: 'latest',
                  sourceType: 'module',
                  globals: {
                    ...globals.browser,
                    ...globals.es2021,
                    ...globals.node,
                  },
                },
                rules: {
                  'no-undef': 'off',
                  'no-unused-vars': 'off',
                },
              },
            ];

      - name: Perfom linting
        run: npx eslint .
Congratulations !!!… You can successfully created you first GitHub Action workflow that actual servers a real-world purpose. So, let’s go ahead and update our checklist for one last time…
- Install Node.js
- Create
npmenvironment - Install Eslint
- Configure Eslint
- Perform linting
I personally always feel great, when I successfully check all the things in my list ‘cause it happens very rarely, LOL…
But we’re not done yet…
One final push
Now that we’re done with scripting our workflow, we have to commit it and push it to our repo, so see the changes in the Actions tab of your repo and also to test whether your workflow is working as expected or not…
1
2
3
4
5
6
7
8
# Adding the files
git add .

# Commiting the changes (you can modify your commit message as you like)
git commit -m "Added linting workflow"

# Pushing to your repo
git push origin main
If you branch is
mastersomehow, then you have to say,
If you want to check your branch you can use
git branchcommand to view all the branches present within your repo.
Now that you have pushed you might be able to see some changes on your Actions tab of you repo. You can see the empty spacing saying “There are no workflow run yet” under section that says “All workflows”, just as shown below,
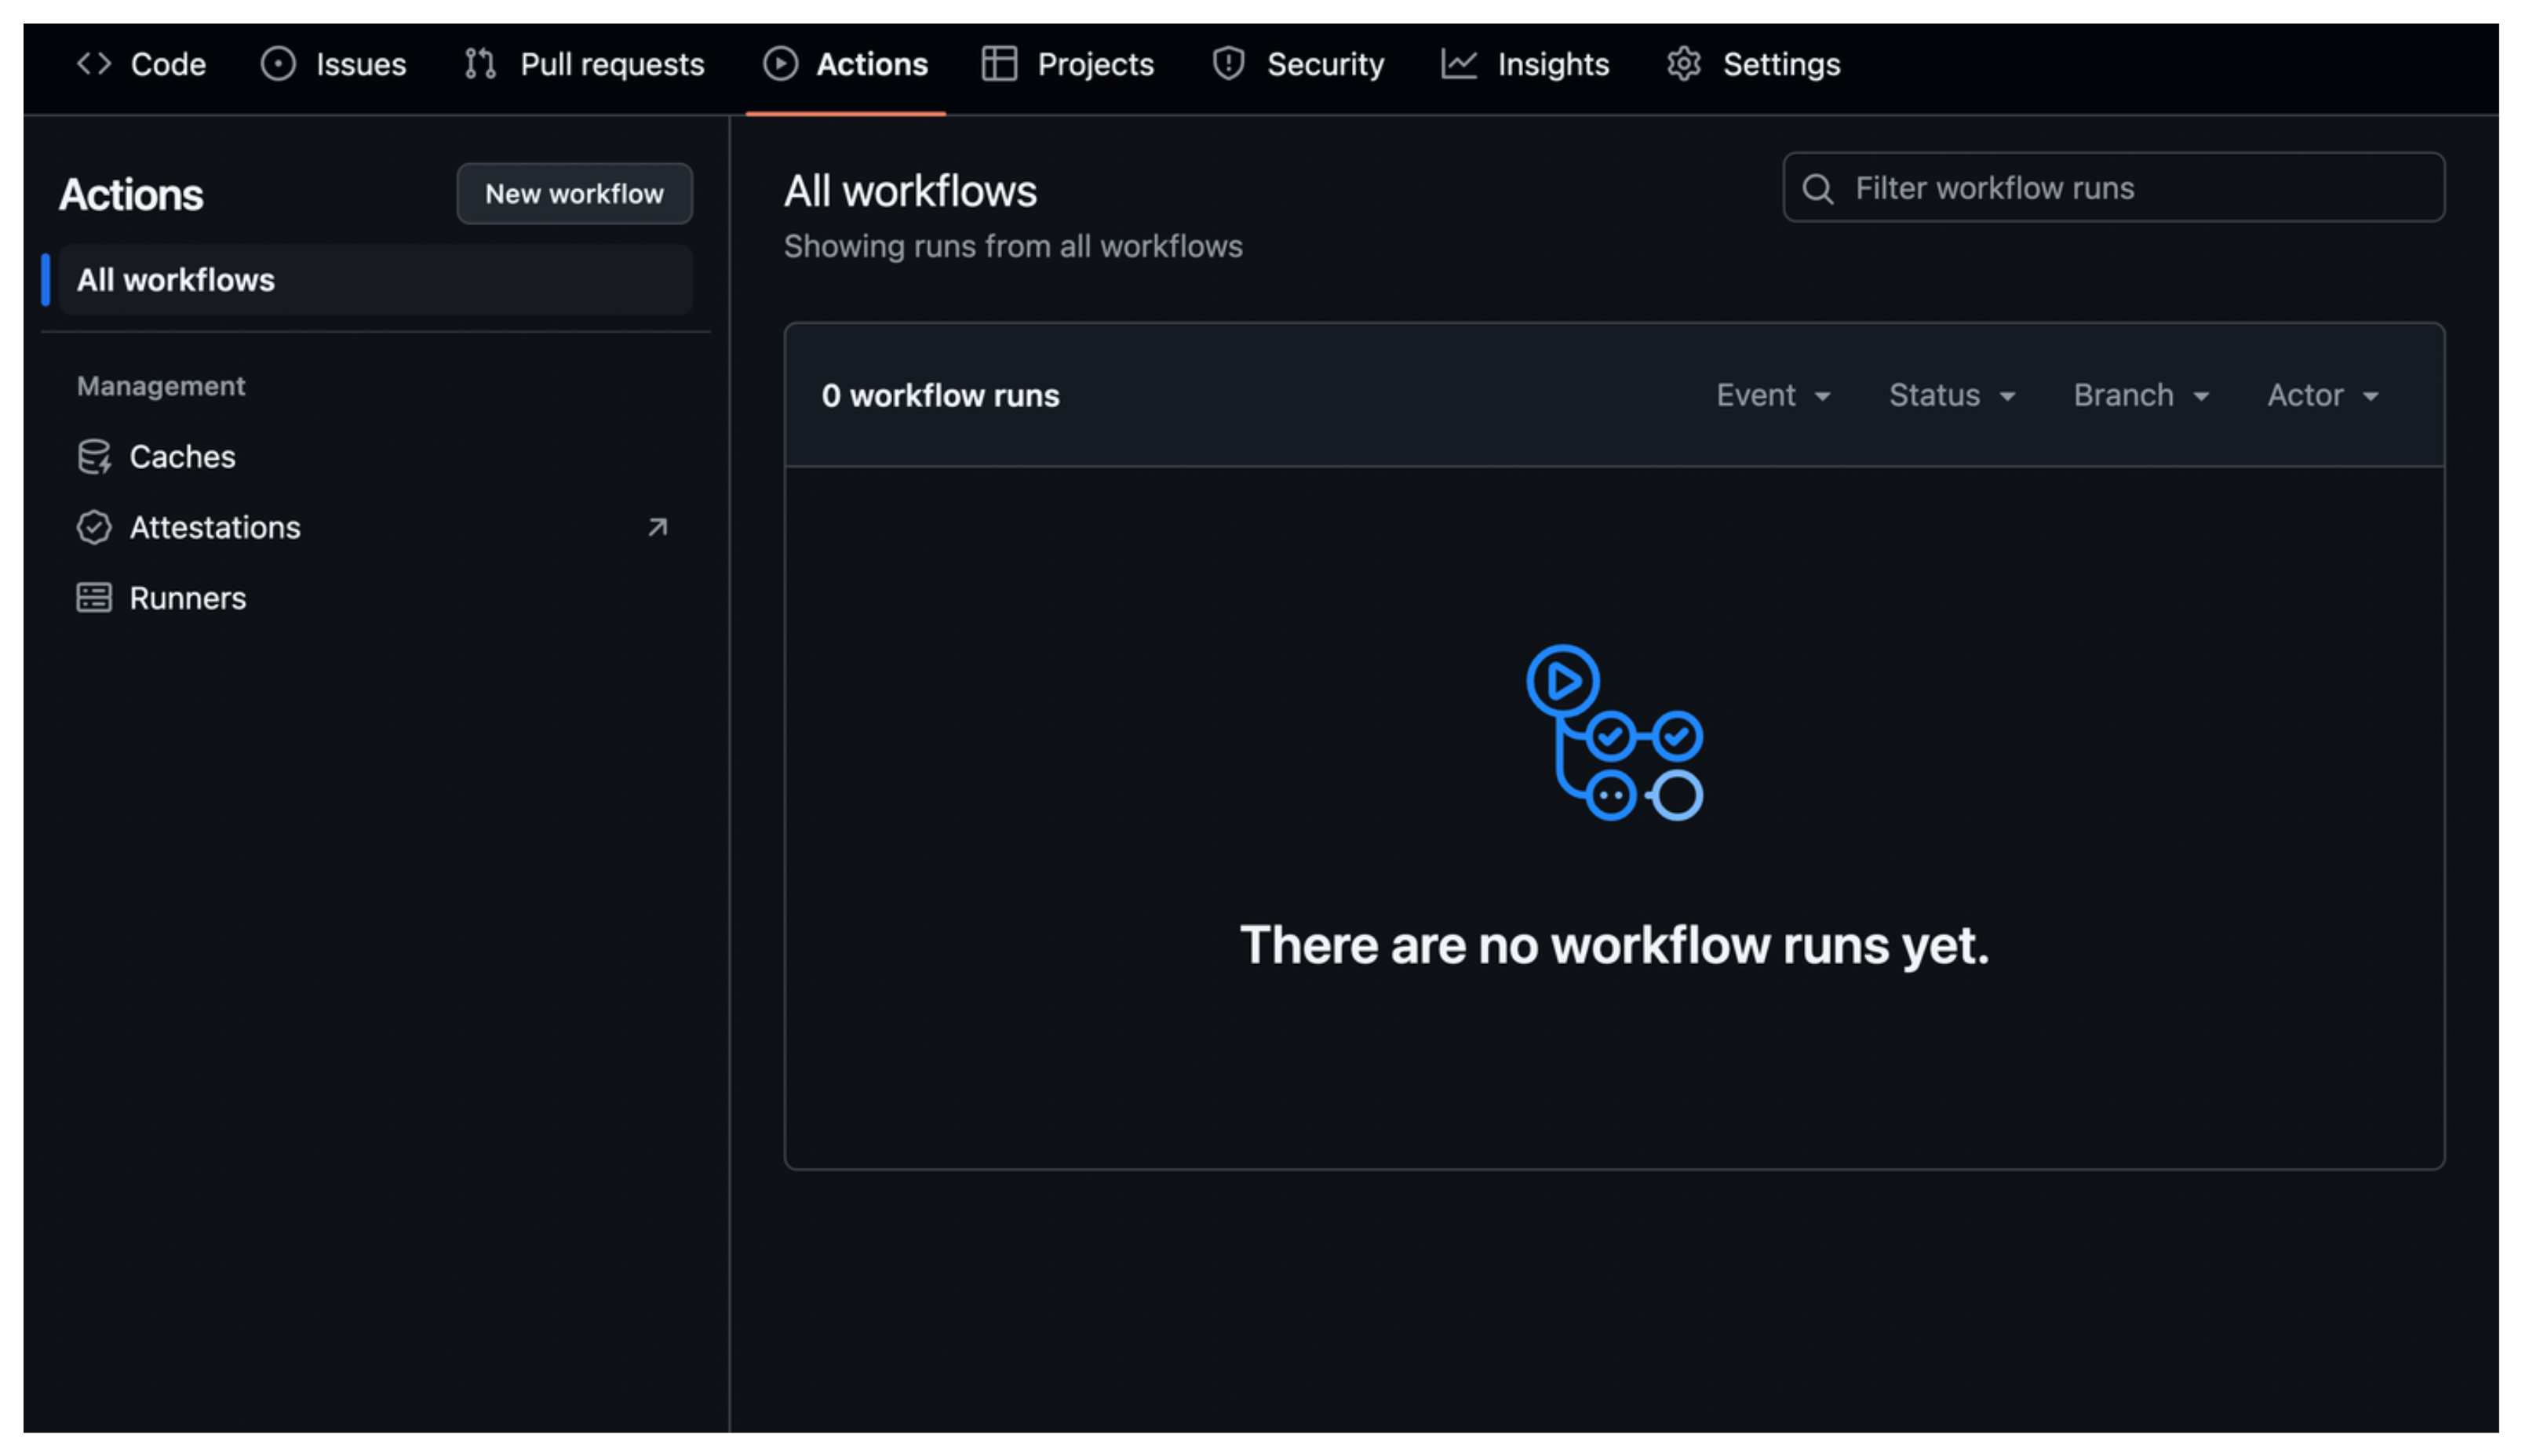
Great, let’s go ahead and test whether out linting workflow is working or not…
Testing the workflow
Before we proceed with testing our workflow, let make test cases…
- Workflow should pass when there’s no issue with the source code.
- Workflow should fail when there’s an issue with the source code.
Keeping this let’s create two PRs with simplest code possible i.e., printing “Hello world”.
Pass when no issue
Let’s go ahead and create a new branch with name like should-pass and create a simple javascript file, let’s name it as testing.js for now…
1
2
3
4
5
# Creating and switching a new branch
git checkout -b should-pass

# Creating a new empty JavaScript file
touch testing.js
Great, now let’s print “Hello World” using console.log,
1
console.log('Hello World');
Now, let’s commit and push this code to our repo and create a pull request,
1
2
3
4
5
6
7
8
# Adding the files
git add .

# Commiting the file
git commit -m "Added a new file testing.js"

# Pushing the changes
git push origin should-pass
Now, let’s create a pull request from should-pass branch to main (or master) branch.
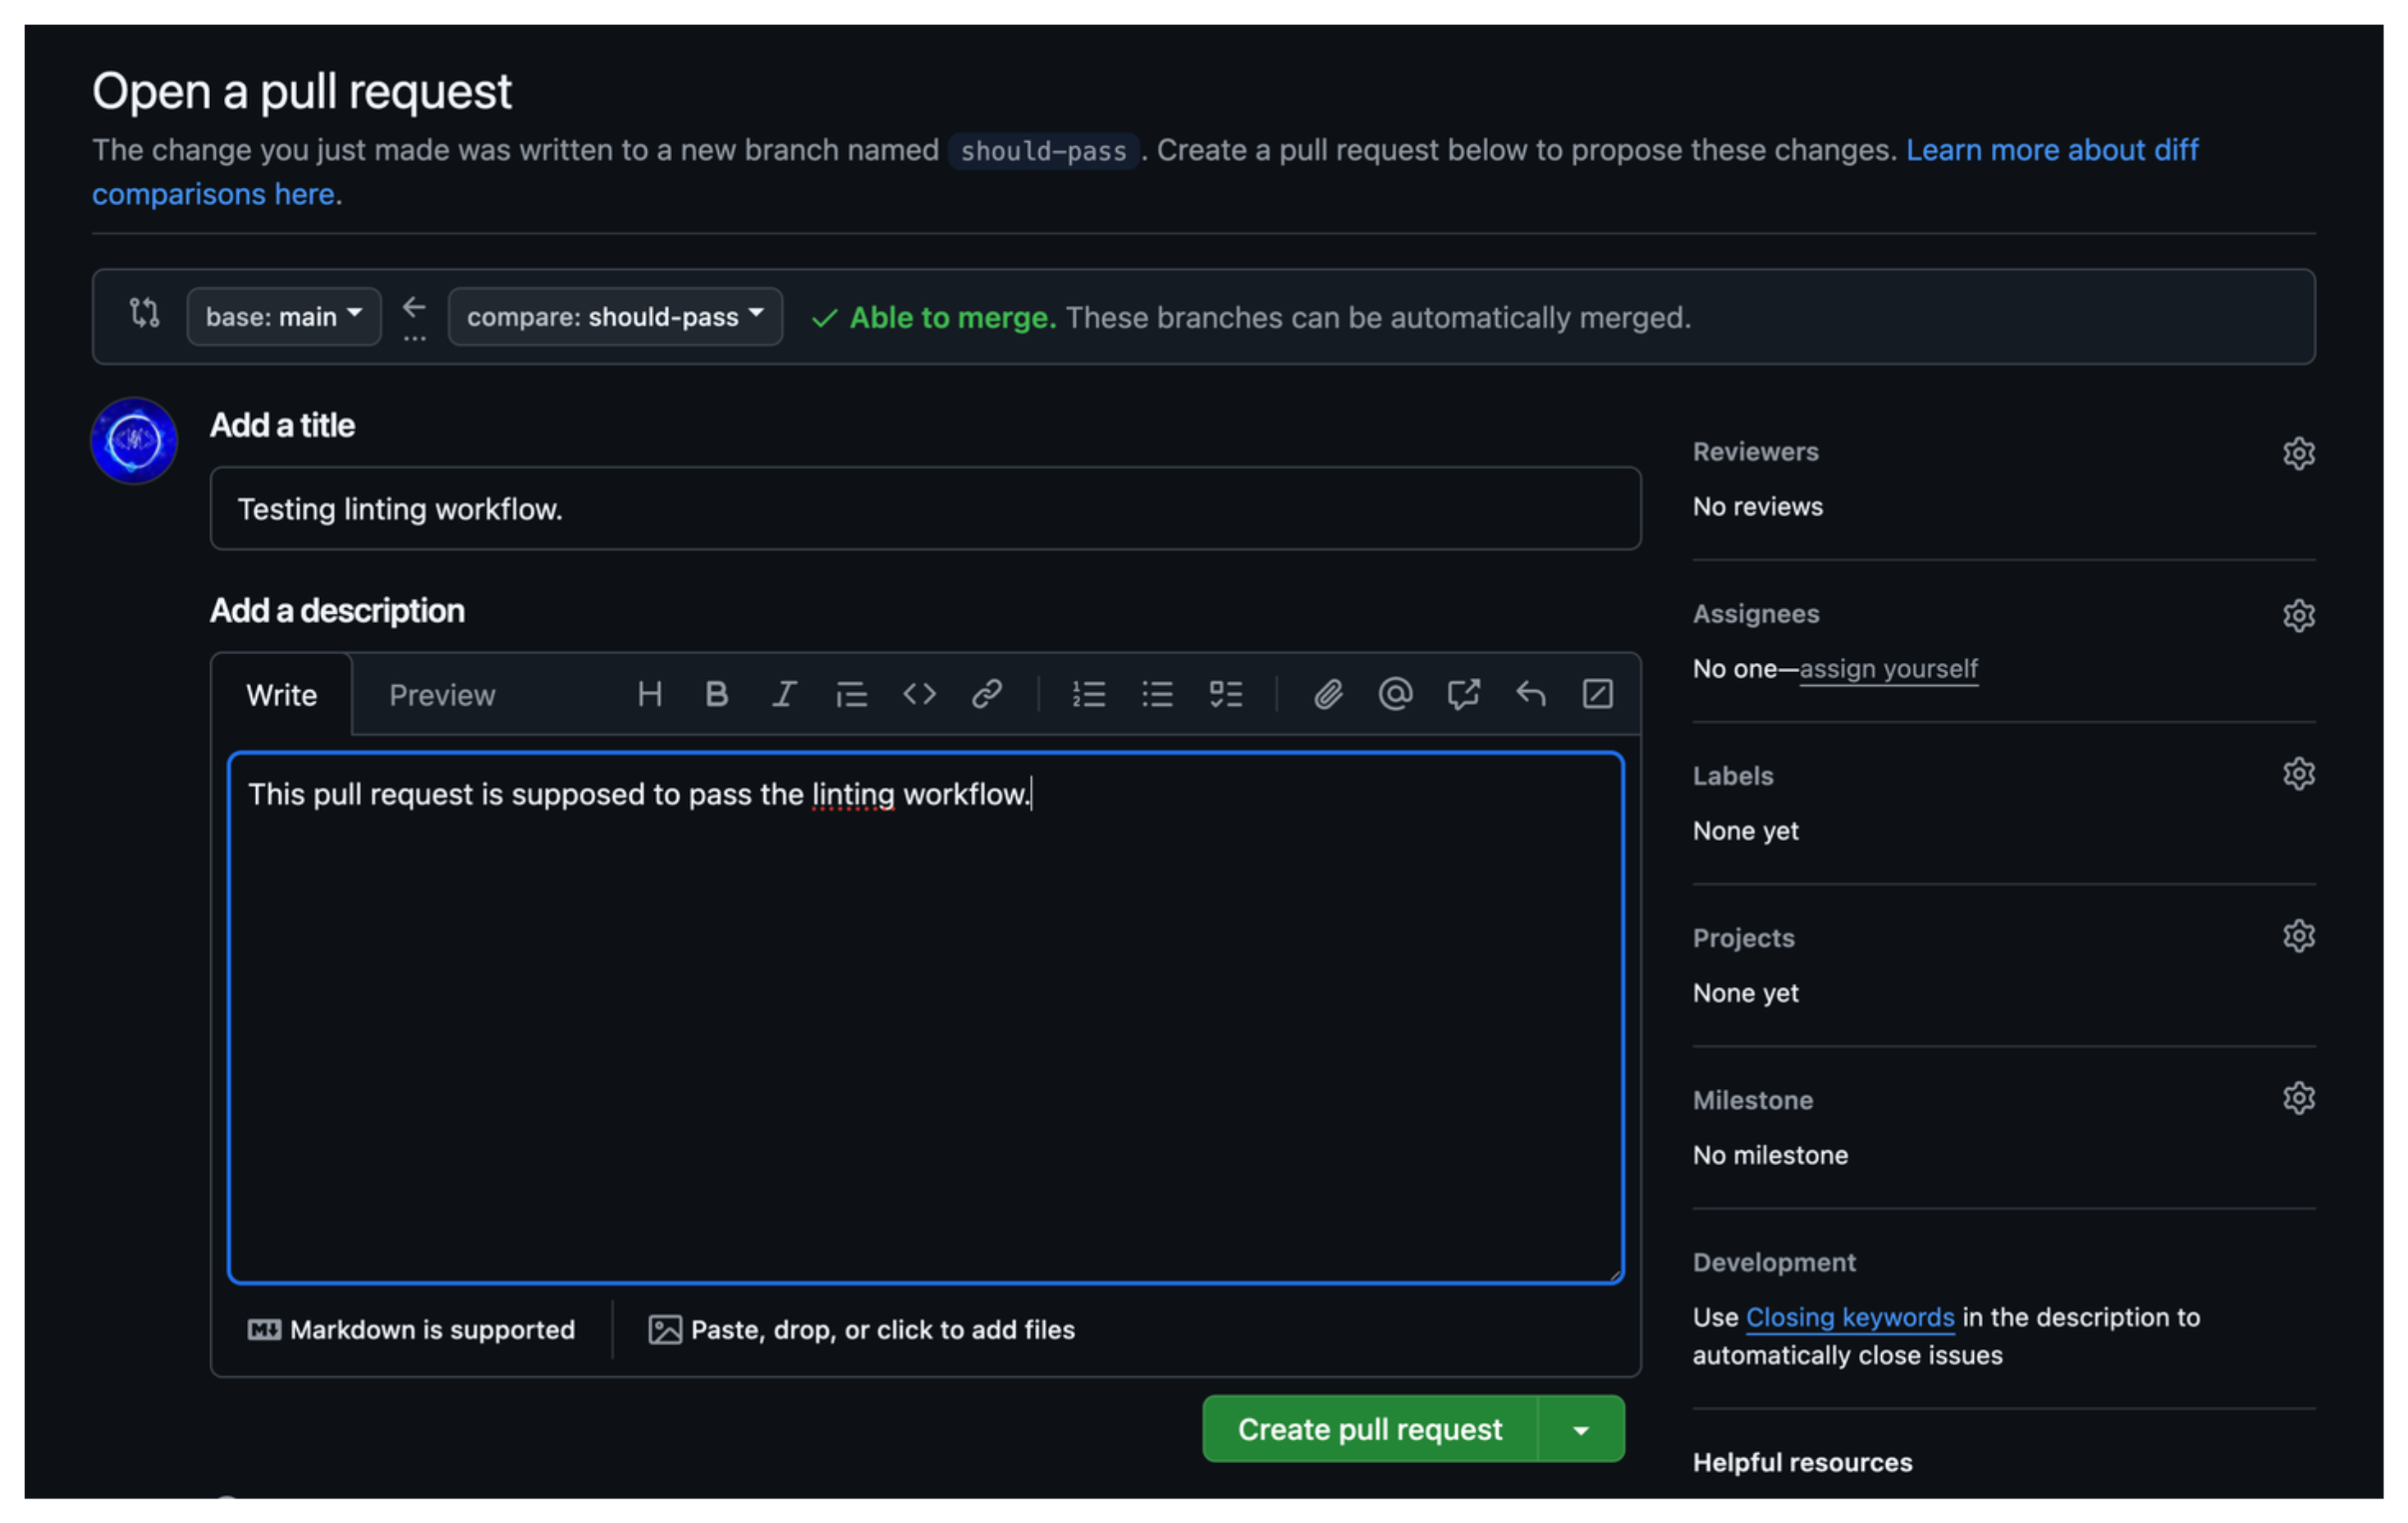
And as soon as you created the PR, you can see the linting workflow started,
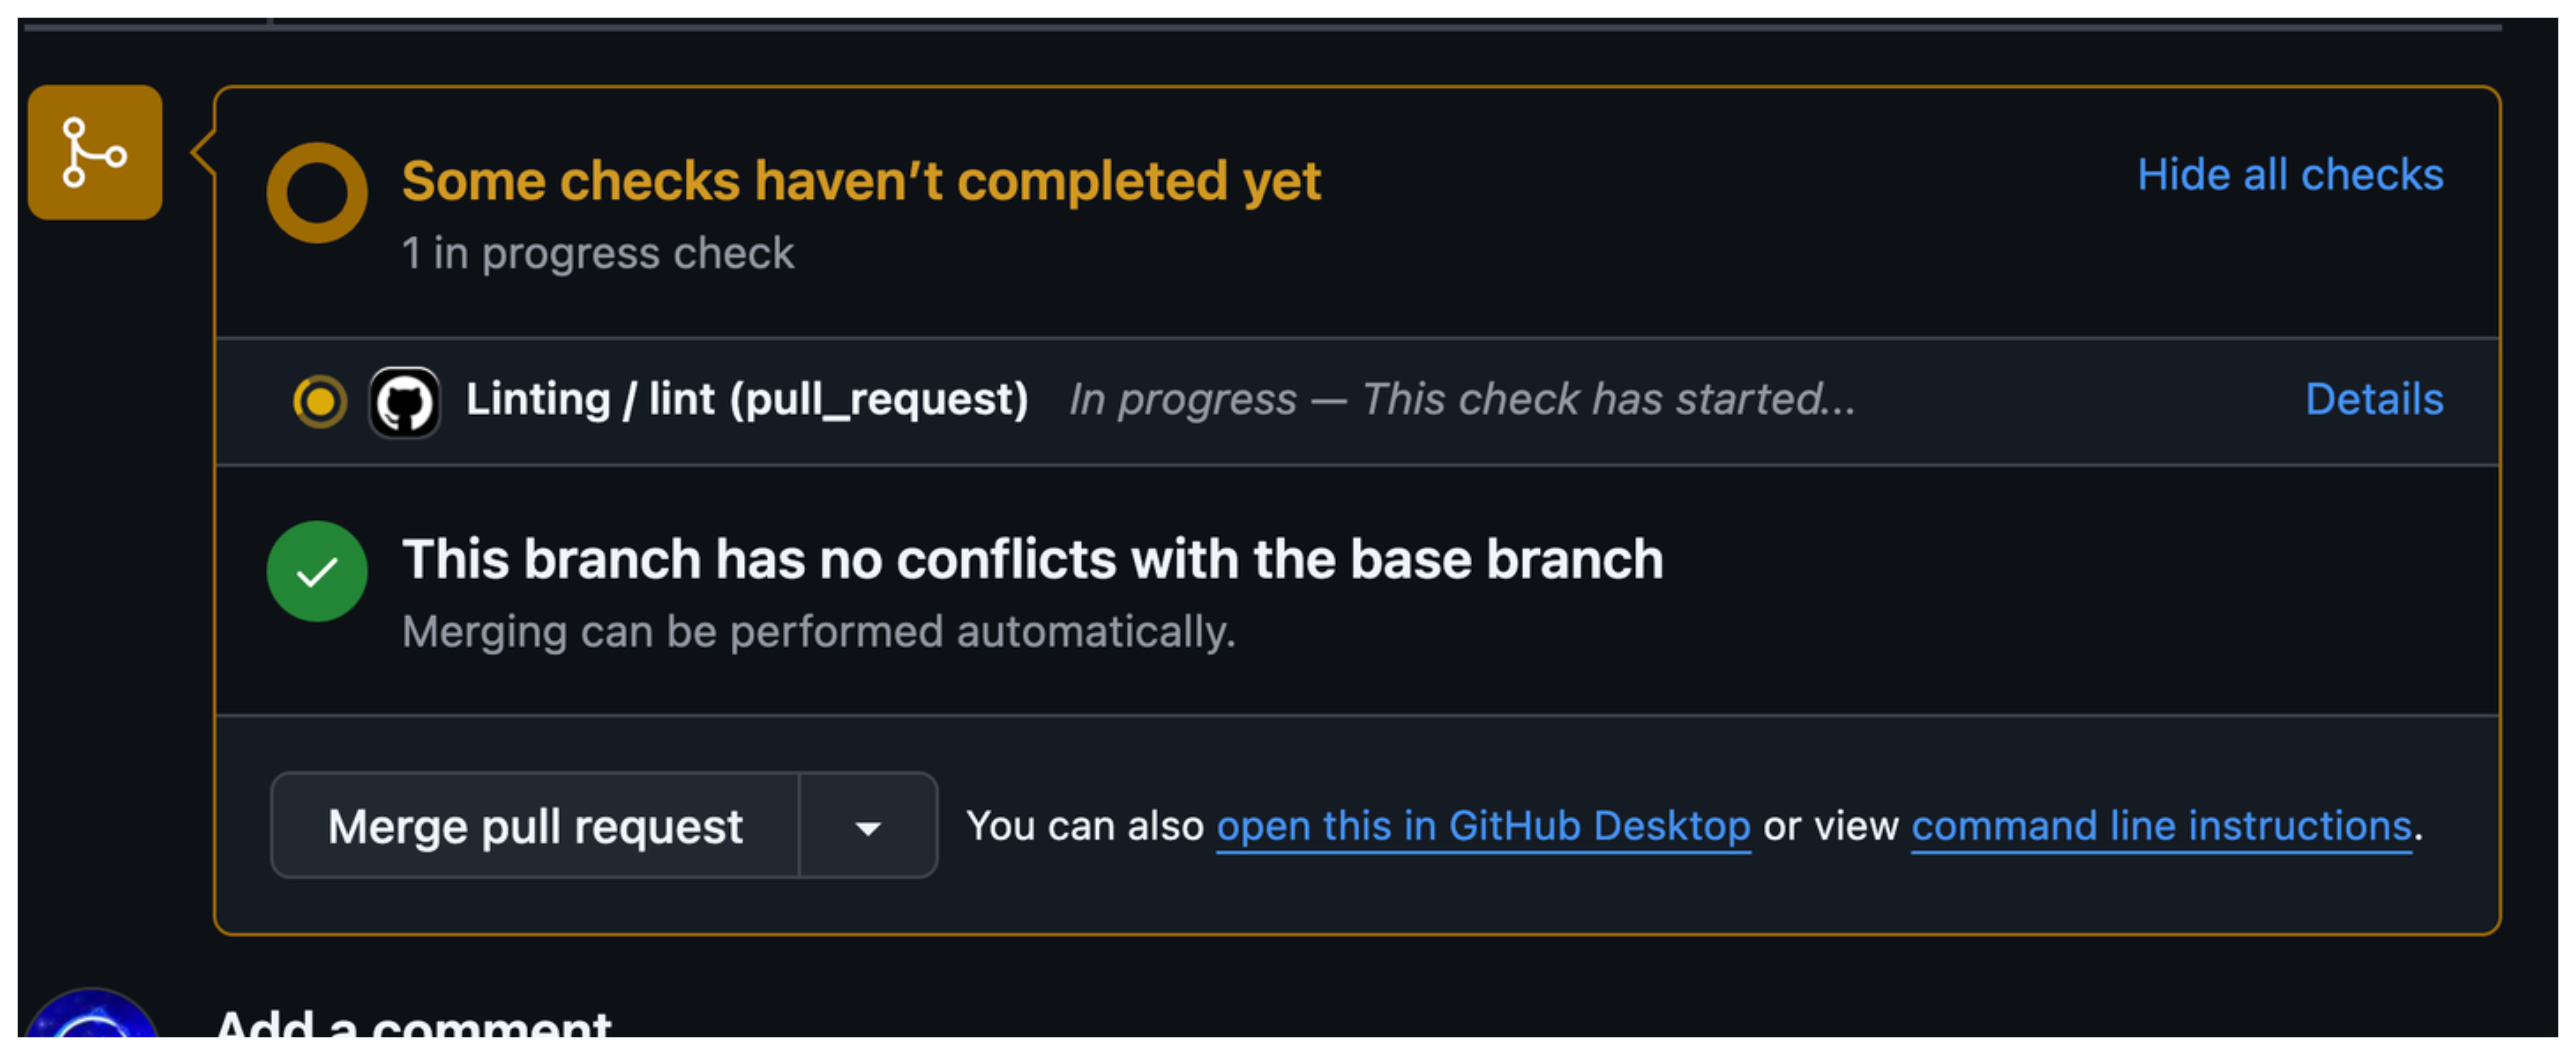
And when I clicked, the linting work is done and all the checks have passed…
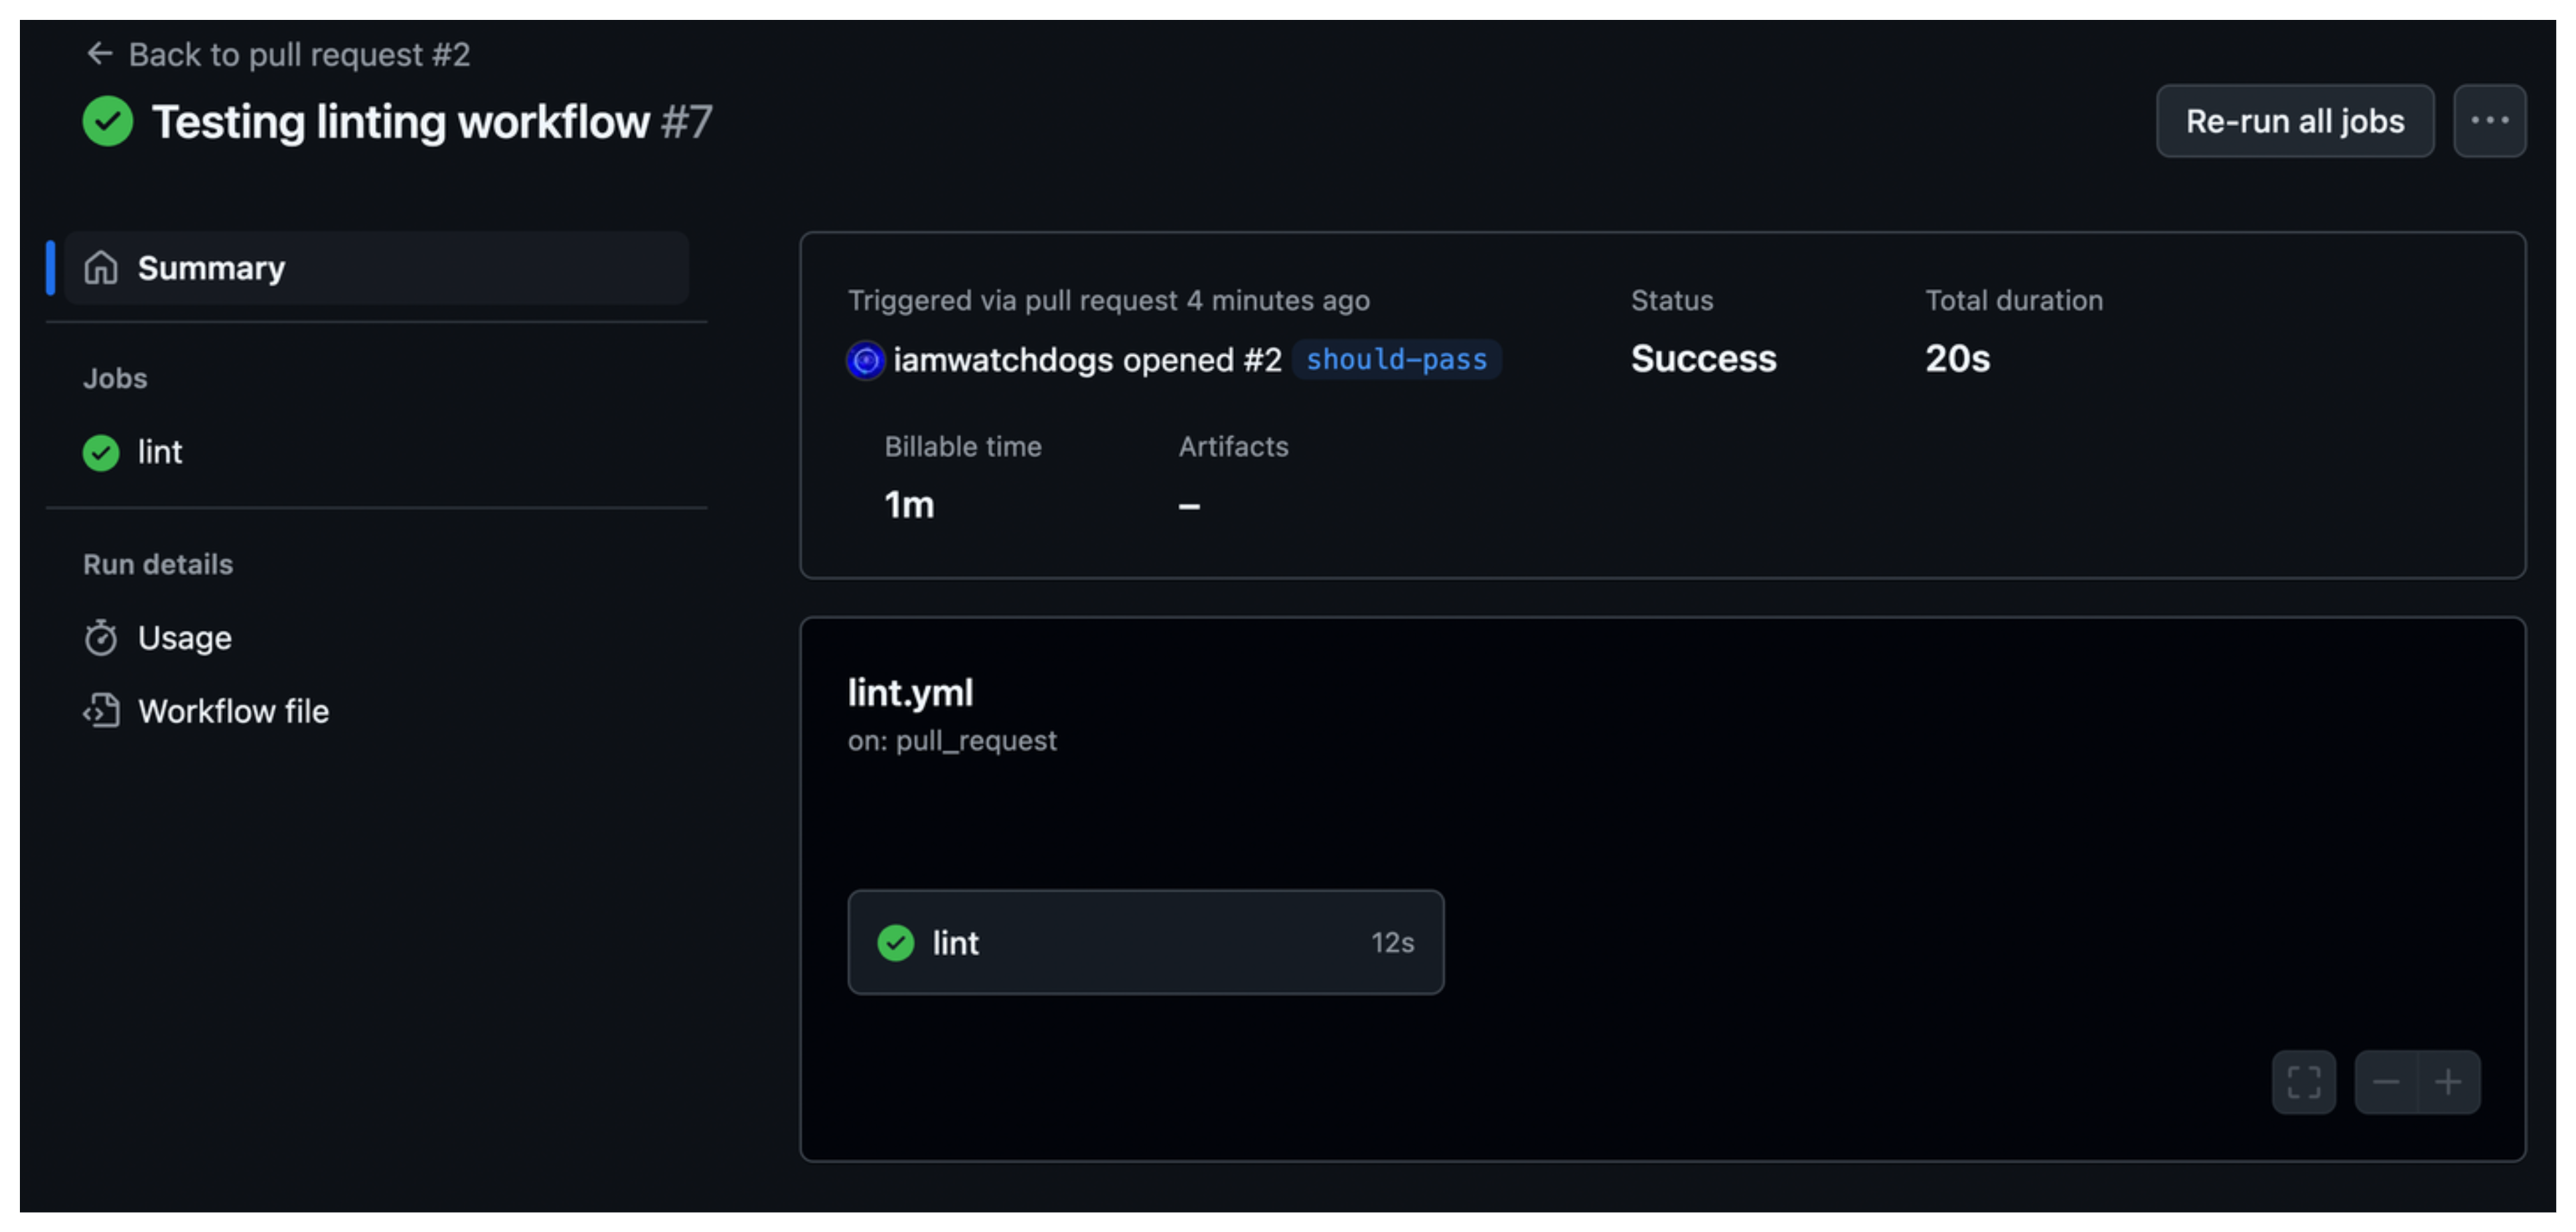
Now, I can merge the PR without any issue as the new changes from the PR won’t be affecting my current source code.
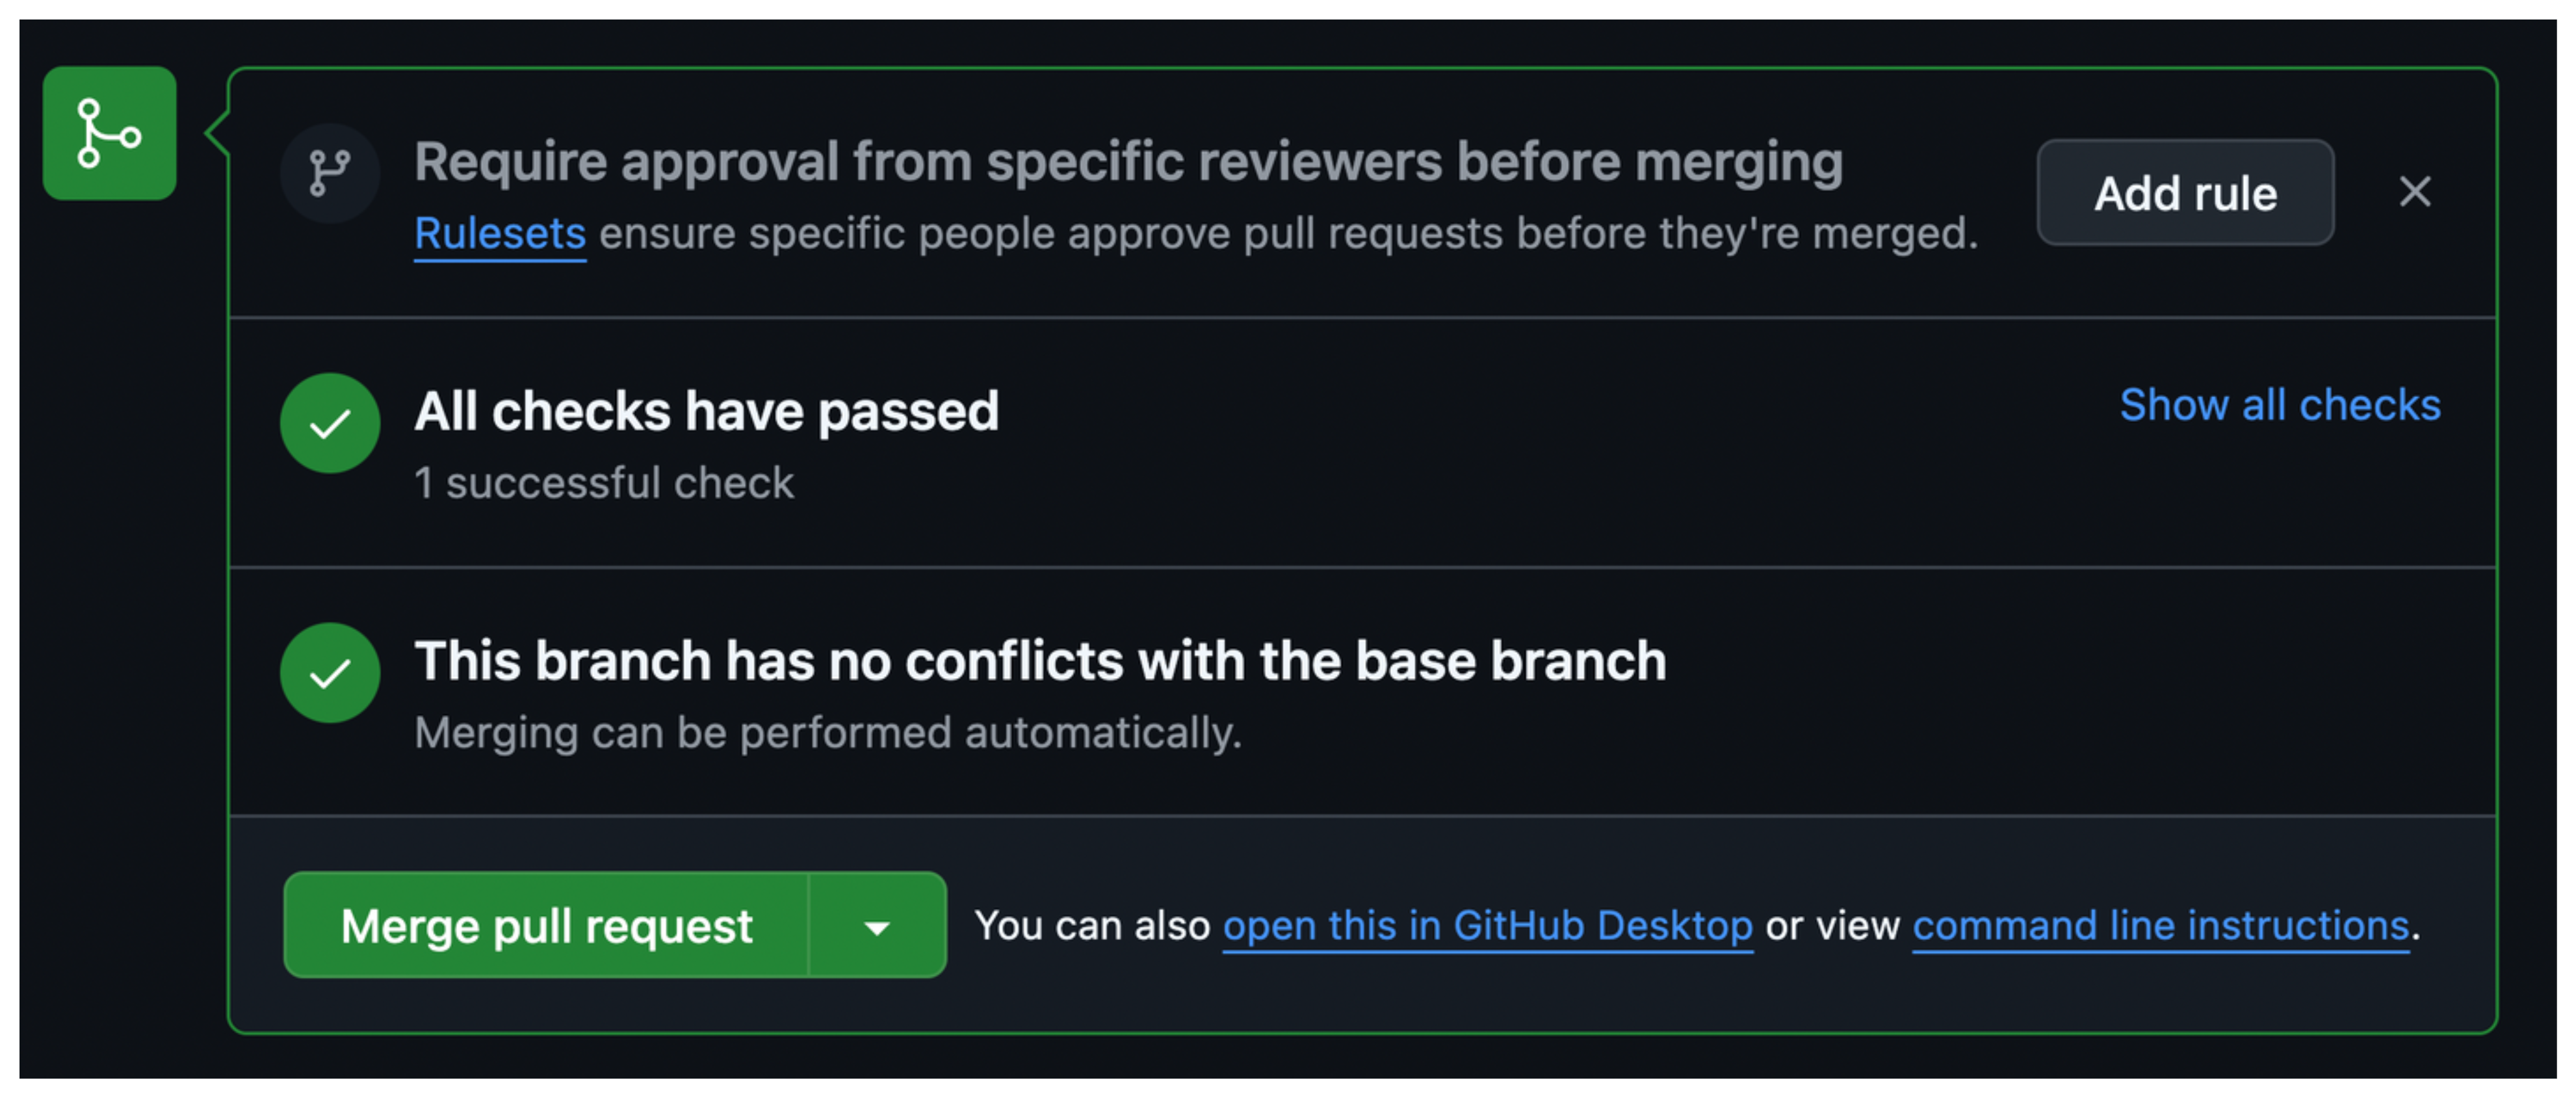
I’ll go ahead and merge it and check on our checklist as it’s working as expected,
- Workflow should pass when there’s no issue with the source code.
- Workflow should fail when there’s an issue with the source code.
Fail when there’s an issue
Since, we have merge the PR, let’s pull the changes and then create a new branch to make a faulty PR to check whether our lint find out faulty code or not.
1
2
3
4
5
6
7
8
# Checkout to main/master branch
git checkout main

# Pull the changes
git pull origin main

# Create and switch to a new branch
git checkout -b should-fail
Now, let’s make changes within the same testing.js file so that it has some syntax error. So, let’s miss a single quote on purpose this time.
1
console.log('Hello World);
Great, let’s commit, push and create a new PR and see what’s gonna happen…
1
2
3
4
5
# Adding and Commiting the changes
git commit -am "made a syntax error"

# Push the changes
git push origin should-fail
And as we can see here, the linting checks fails,
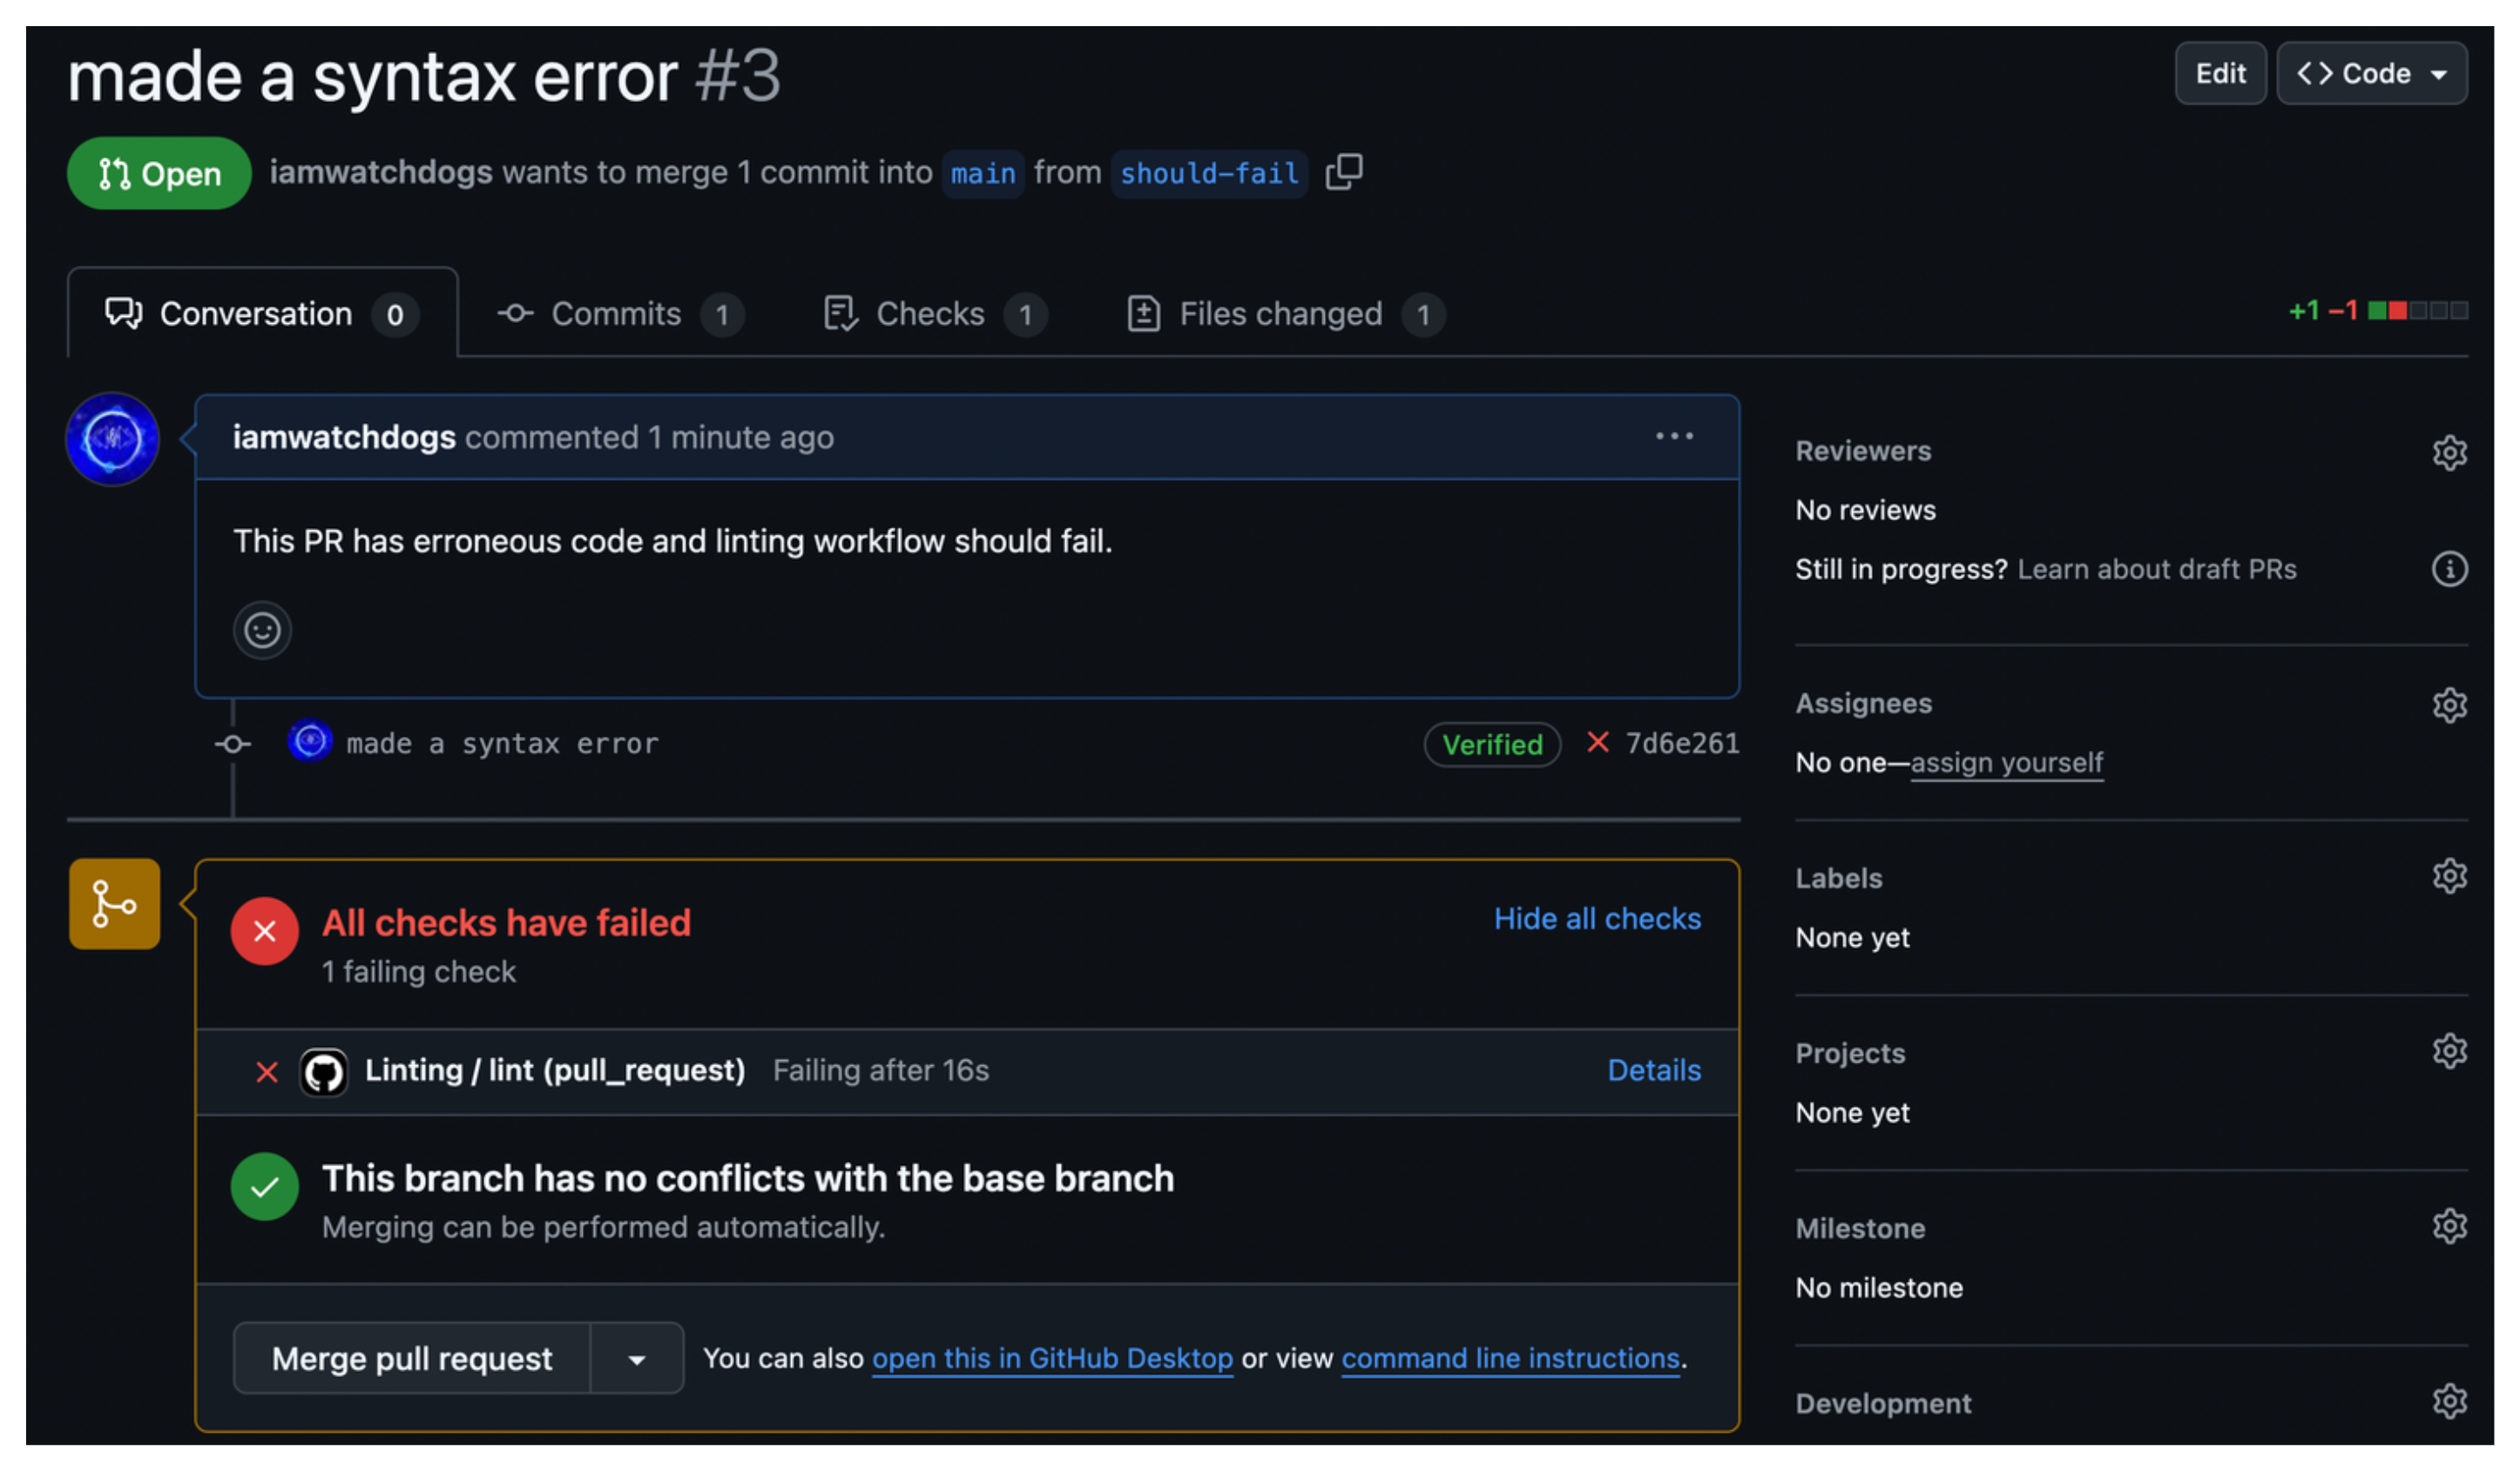
And when you click on Details option, you can see the logs of the failed step which helps us find the issue that caused the workflow to fail,

And now, using the logs we can conclude that the linter workflow failed due to the single quote we removed. This concluded that our workflow works as expected, so let’s go ahead an check our checklist,
- Workflow should pass when there’s no issue with the source code.
- Workflow should fail when there’s an issue with the source code.
Nice, way to go guys… You did a great job. But if you think we’re done, you’re wrong…
Using libraries/frameworks ?
If you’re project is based on a library or framework, then most of the times you’ll be building your project on a starter template that is provided by the library or framework. For example, when you initate a React project using vite then you have a simple starter template from which you remove the default stuff and do your own thing, same thing goes for frameworks like Angular, etc.
And along with these starter template comes preconfigured tools such as,
- Dev server
- Production level Bundler
- Code formatter
- Linter
- Testing utility
- etc.
Yes, not all of these libraries/frameworks have all of the above tools but most of them have a linter, so it make our job even easier to update our workflow. So all we need to do is to install the dependencies and run the predefined script npm run lint.
So, Here’s the updated workflow for your library/framework-based project…
1
2
3
4
5
6
7
8
9
10
11
12
13
14
15
16
17
18
19
20
21
22
23
24
25
26
27
28
29
name: Linting

on:
  push:
    branches: [main]
    paths: ['*.js', '**/*.js']
  pull_request:
    branches: [main]
    paths: ['*.js', '**/*.js']


jobs:
  lint:
    runs-on: ubuntu-latest

    steps:
      - name: Checkout repo
        uses: actions/checkout@v4

      - name: Setup Node.js
        uses: actions/setup-node@v4
        with:
          node-version: 20

      - name: Install dependencies
        run: npm install

      - name: Perfom linting
        run: npm run lint
In case your starter template does have any preconfigured linter then, you can configure it yourselves and believe it or not, we already did that. So, here are the steps you can follow to configure a linter so that you can use the above workflow itself.
- Install eslint and other dependencies: You might already know the dependencies required to install (we have already did this before) and here they are,
1
npm install eslint @eslint/js globals --save-dev
Configuring eslint: Again we did this before, all you need to do is create a
eslint.config.cjsfile on root of your project and define the configuration as follows.1 2 3 4 5 6 7 8 9 10 11 12 13 14 15 16 17 18 19 20 21 22 23 24
const js = require('@eslint/js'); const globals = require('globals'); module.exports = [ { ignores: ['**/*.min.js'], }, js.configs.recommended, { languageOptions: { ecmaVersion: 'latest', sourceType: 'module', globals: { ...globals.browser, ...globals.es2021, ...globals.node, }, }, rules: { 'no-undef': 'off', 'no-unused-vars': 'off', }, }, ];
Adding script: Now that we have configured eslint, all we need to do is update the scripts within your existing
package.jsonso that we could perform linting usingnpm.1 2 3 4 5 6 7 8 9 10 11 12 13
{ /* other configs */ "scripts": { "dev": "<some-script>", "build": "<some-script>", "lint": "eslint . --ext .js" }, /* other configs */ }
That’s it you have configured eslint to your project built upon npm environment and you can use the above workflow.
Please do note that, this config might not support with each and every library/framework as they might have different level of tooling required.
For example, React used special JSX syntax and Angular uses Typescript by default. Both of them are not pure javascript and required several modification to our linter configuration to support these specifications.
Please make sure to read the eslint official docs before you make required configuration that suits your library/framework-based project.
Wrap up
That’s quite a journey and I appreciate you sticking around till the end. I really hope you enjoyed learn GitHub Action and understand the very fundamentals that helps you design your full end-to-end solution all by yourself.
I hope you understand how easy it is to use GitHub Action and do amazing stuff. I insist you to give it a try and I promise you gonna love this so much that there won’t be an repo without a GitHub Action workflow.
See you in another blog, Shamith signing out.