Contribute to Notebook

Welcome to the Notebook open-source project, where you can be a part of a thriving community of technical writers and developers! This project utilizes GitHub’s Jekyll1 framework to create a dynamic platform for sharing technical knowledge and learning from one another. Whether you’re a beginner eager to learn or an experienced developer looking to contribute, Notebook offers a win-win opportunity for all.
Getting Started
Setting up Environment
Let’s start by setting up the project within your local system. Most of the cases, you won’t face any issues while building the project within your local system if you follow the instruction below properly. But if you’re facing any issue, you can post them within the repo discussion Help Request…
Using Dev Container
This approach is platform independent as it uses Docker to create the isolated development environment within dev container. You can use it Windows, Linux and MacOS system with ease. Let’s start from scratch, shall we ???…
- Start by downloading and Installing Docker Desktop on your system.
- Then download and install VS Code.
- Within your VS Code, Install Dev Container extension from the extensions tab.
Well that’s it… You got the all the things are ready and all you gotta do is reopen the project file by clicking Reopen in container, just as shown below…
Dev container does all the heavy lifting for you and creates a container and setup the required environment for you. Now, you can write your blog within this dev container and then commit and push your changes though the shell of the container.
If you’re doing this for the first time, it might take a while depending on your system specs.
For Windows:
Coming to windows-based system, it highly recommended to use Dev Container approach as it simplifies the complex installation and dependencies handling. But if you wish to go for a native installation, You can find it in the below disclosed details below.
Native Installation (Not Recommended)
So you want to do things in a hard way. It's not like we're hear to judge you, but all we got to say is that "THIS 👇" is one heck of a process you have to go through. Can't you just stick to Dev Container ???...
Anyways, Here's how you can setup the required environment thought native installation in Windows...
- Start by downloading and installing the
Rubyusing Ruby Installer, and choose the latest one with Devkit with default options. - Run
ridk installon command prompt, If the installer doesn't prompt you the following image at the end of the installation...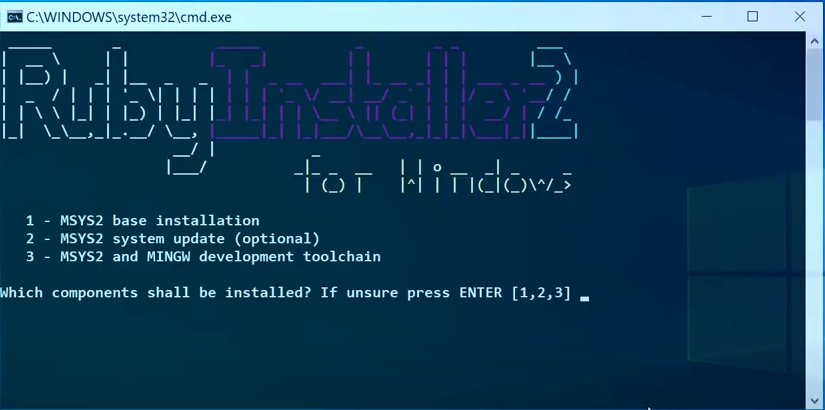
- Go ahead and select MSYS2 and MINGW development toolchain option by pressing
3+ Enter - Open a new command prompt window from the start menu, Use the following command to check whether
Rubyhas been properly installed and itsPATHhas been set properly.1
ruby -v
- Now use the following command to install
JekyllandBundler:1
gem install jekyll bundler jekyll-theme-chirpy
- Now, your system is ready to build and use the project locally.
You can checkout Jekyll Docs for more details regarding installation.
For Unix-based Systems:
For Unix-based systems, it’s recommended to go for native installation but you can do for Dev Container if you want some application-level isolation. Now that’s out of our way, let’s take a took at the installation process…
- Installing Jekyll framework with required dependcies based on your system/distro from Jekyll official docs.
- And that’s it… you’re done, you got required environment for running project.
Just so that we get a glimpse of a native installation, let’s take a look how we do things in unix-based system by taking Ubuntu (most popular distro used from beginners to general-purpose user and power users).
- Starting up by updating your system file using,
1
sudo apt update -y && sudo apt upgrade -y
- Now it’s time for
rubyand other core dependencies,1
sudo apt -y install ruby-full build-essential zlib1g-dev
- Now that we’ve got our core dependencies, let’s add environment variables,
1 2 3
echo '# Install Ruby Gems to ~/gems' >> ~/.bashrc echo 'export GEM_HOME="$HOME/gems"' >> ~/.bashrc echo 'export PATH="$HOME/gems/bin:$PATH"' >> ~/.bashrc
Note that as it’s not recommended to install or set environmental variable on
rootlevel and keep thingsuserlevel, atleast as recommended by official docs. But if you still want to do, just make sure you know what you’re doing.
- Now, let’s source the
~/.bashrcto access the environmental variable within the current session.1
source ~/.bashrc - Now that we have installed dependecies and configured all the environmental varible, let’s test if
rubyis installed properly or not…1
ruby -v - Finish up the installation by installing required dependecies for the project,
1
gem install jekyll bundler jekyll-theme-chirpy - And it’s done, now you have the required environment to run the project.
For MacOS:
Coming to MacOs-based system, it kinda similar situtation with Unix-based system ‘cause it’s one of the offspring of Unix-based system. Anyways, all I was trying to say is that you can either with native installation (which is recommended) or Dev Container (another fairly good option). And if you want to proceed with native installation, here’s how you can do it…
- Make sure you have Homebrew package manager installed. If not you can install using,
1
/bin/bash -c "$(curl -fsSL https://raw.githubusercontent.com/Homebrew/install/HEAD/install.sh)"
If you’re facing any issues while setting up the project in MacOS, check out the Trobleshooting post within the Help Request discussion.
- Now we’re going install
chrubyas version manager to install and manager various version ofruby1
brew install chruby ruby-install - Let’s go ahead and install
rubyversion 3.4.1 which is recommended by official docs.1
ruby-install ruby 3.4.1
- Now that’s done, let’s configure the shell for
chrubyto work as expected.1 2 3
echo "source $(brew --prefix)/opt/chruby/share/chruby/chruby.sh" >> ~/.zshrc echo "source $(brew --prefix)/opt/chruby/share/chruby/auto.sh" >> ~/.zshrc echo "chruby ruby-3.4.1" >> ~/.zshrc # run 'chruby' to see actual version
If you’re using Bash, replace
.zshrcwith.bashrcor.bash_profile. If you’re not sure, read this external guide to find out which shell you’re using.
- Now that we have configured
chruby, let’s make sure the changes are updated within our current session,1 2 3 4 5 6 7 8 9 10 11
source ~/.zshrc # # If your default shell is bash, then use the following # # source ~/.bashrc # # (or) # # source ~/.bash_profile # # depending on where you have configured
- Time for testing !!!… Let’s see if
rubyis installed properly or not,1
ruby -v - Finally, let’s install the core dependencies for the project…
1
gem install jekyll bundler jekyll-theme-chirpy - Now you’re ready to use the project…
Building the Project
After setting up the environment, you can start contributing to the project:
Start by forking the repository.
- Clone the forked repository to your local machine.
1
2
3
4
5
# cloning the repo
git clone https://github.com/<your-github-user-name>/Notebook.git

# entering the project directory
cd Notebook
- Use the following command to install project dependencies.
1
bundle
- Host the static website locally using the following command to preview the current state of the project.
1
bundle exec jekyll s
Use
--incrementalargument to update the project live while working on it…
If project build is successful, then you can view the project build that is hosted through your localhost:4000/Notebook. Well done, you have successfully setted up the project within your local system.
Contribution Guidelines
To contribute effectively, please follow these guidelines:
All of the technical writing will be done in Markdown format. So, Make yourself more comfortable Markdown sytnax through Offical GitHub Documentation.
Since this open source is based chripy2 theme jekyll project, You’re not limited by Markdown only. You can do much more using simple Markdown that support limited HTML elements. Check out the Chirpy-based post creation and text and typography.
Place your technical writing files within the
_posts. directory, following the naming conventionYYYY-MM-DD-file-name.md, e.g.,2023-09-27-welcome-to-notebook.md. Use lowercase letters and separate words with a single dash.Add your author details to the
_data/authors.yml. file in the following format:1 2 3 4
unique_key_value: name: <author_name> twitter: <twitter_id> url: <personal (or) contact url>
For example:
Store images used in your content in
assets/img/<your-project-name>/. While using external CDN links is recommended, you can also place files in this directory if necessary.Each technical writing Markdown file should begin with the following configuration:
1
2
3
4
5
6
7
8
9
10
11
12
13
---
title: <title>
date: YYYY-MM-DD HH:MM:SS +/-TTTT
categories: [<main_categories>, <sub_categories_1>, ..., <sub_categories_n>]
tags: [<tag_1>, ..., <tag_n>]
author: <respective_author_key_value>
media_subpath: "/assets/img/<your_img_directory_name>/"
image:
  path: <name_of_the_img_for_page_cover>
  alt: <alternative_text>
---

# Your content writing begins here
Example:
Note that the
+/-TTTTin thedatesection refers the UTC offset. You can find your UTC offset value by searching for your country in the list of UTC. And if you’re from India, you can use the above UTC offset from the example.
Please ensure your contributions adhere to these guidelines to maintain consistency and make the project more accessible and user-friendly. Happy contributing!
Footnote
GitHub’s Jekyll Framework offical Page: https://jekyllrb.com ↩︎
Chirpy Jekyll theme’s Offical Website: https://github.com/cotes2020/jekyll-theme-chirpy ↩︎